Wintertime Comfort Food

It’s rainy and cold here today – we’ve gone from 60-70 degrees on Tuesday to much cooler temperatures today.  I thought I’d share some of my favorite recipes for comfort foods for cold, blustery days like today.  Some of these are crock-pot recipes and some are stovetop, although quite a few of the stovetop ones I’ve done in the crock pot as well.  These are old standby recipes that I turn to again and again for something warm, hearty and filling for my family.  An added bonus is that with most of them I can sneak some veggies in without too much protesting from the troops.

Beef Stew: This recipe originated from one of those little recipe books you pick up at the checkout in the grocery store. I’ve tweaked it and made it my own and we love it.  It’s also great for feeding a crowd. I usually make this in the crock pot but there is no reason why you couldn’t simmer it on the stove if you don’t have a crock pot.

IMG_2226

Pasta Fagioli: This is one of my all-time favorites.  It just screams “Italian comfort food” to me.  It’s super-easy and can be done in the crock pot or on the stovetop.

French Onion Soup: I don’t know about you, but a rainy, cold day is just perfect for a big bowl of French Onion soup.  My girls have not yet learned to appreciate this soup, so we don’t get to eat it around here as frequently as I’d like to.  But it is always something I order when I’m traveling for work. It makes me feel warm and cozy when I eat it and it’s great for sipping while watching TV in a hotel room. I saw this recipe on a recent episode of Cooks Country (one of my all-time favorite cooking shows – they are the real deal when it comes to cooking shows) and I am thinking I might try it soon. Love the fact that it is slow-cooker friendly.

Chili should be on the list, too, and a good white chicken chili is another recipe I love to make in the cool weather.

My hearty beef chili is another family favorite and I usually serve it with elbow noodles on the side so that the Little Bit can have “chili mac” that she loves. (Here’s my veggie chili recipe just to round out the offerings)

And, of course, you always need a good vegetable soup recipe.  This one I call clean out the crisper” soup because I never know what I’m going to throw in there – it just depends on what I have that needs to get cooked in my veggie drawer.  It’s great for using up leftovers and always tastes so good.

Chicken&Dumplings - Page 050

If you are Southern, then you know a comfort food list is not complete without a recipe for Chicken & Dumplings.  As a matter of fact, I’ve got a hankering for these. Might just make some this week.

Finally, my favorite Chicken Tortilla Soup recipe.  I love the chili-chicken-ness of it and the fact that you can eat it with tortilla chips or all by itself.  If you’re not a fan of Velveeta, here’s another tortilla soup recipe (my original one) without the extra cheese.

I hope these recipes help when you’re on the hunt for something warm and tasty for your family. What sorts of comfort foods do you gravitate towards in the wintertime?


Adventures in Baking Artisan Bread (part 1)

Flour Water Salt Yeast by Ken Forkish

For Christmas, SuperMan got me a cookbook I had been dying to get.
(he is awesome that way)

It’s Flour Water Salt Yeast by Ken Forkish – I’d heard him speak on Martha Stewart radio one day while I was waiting in the carpool line. I was impressed with his story – leaving the tech industry to pursue his passion – and with the fact that he says even the home cook can make excellent home-cooked, artisan breads. I went home and added his book to my wish list.

Thankfully, SuperMan read the wish list 🙂

The Adventure Begins

His book is both a cookbook and a teaching instrument. The first few chapters are dedicated to his story, the principles of artisan breads, familiarizing the reader with different types of breads (levain, poolish, etc.) and then the recipes. I took the book with me to Mom’s house with plans to read it cover to cover before beginning any baking.

My brother, on the other hand, took one look at the book and decided we were baking a loaf THAT NIGHT. He’s adventurous in the kitchen like I am and so we decided to go for it. Or rather, I decided to let HIM go for it and watch the results.

He decided on a basic overnight bread recipe and we ended up staying up until well after midnight (which was fine for his pacific time zone body, but not so nice to mine) waiting for the final steps to complete before we put the dough to “bed” for the final long, slow rise in the refrigerator overnight.

We had quite the adventure making the bread at Mom’s without all of the suggested tools but we made do. One thing you absolutely need to make bread via the “Forkish method” is a cast-iron dutch oven. The proofing baskets, dough tubs, scales, etc. that he suggests I’ve managed to do without (or work around) and we did just fine that first time without them, too.

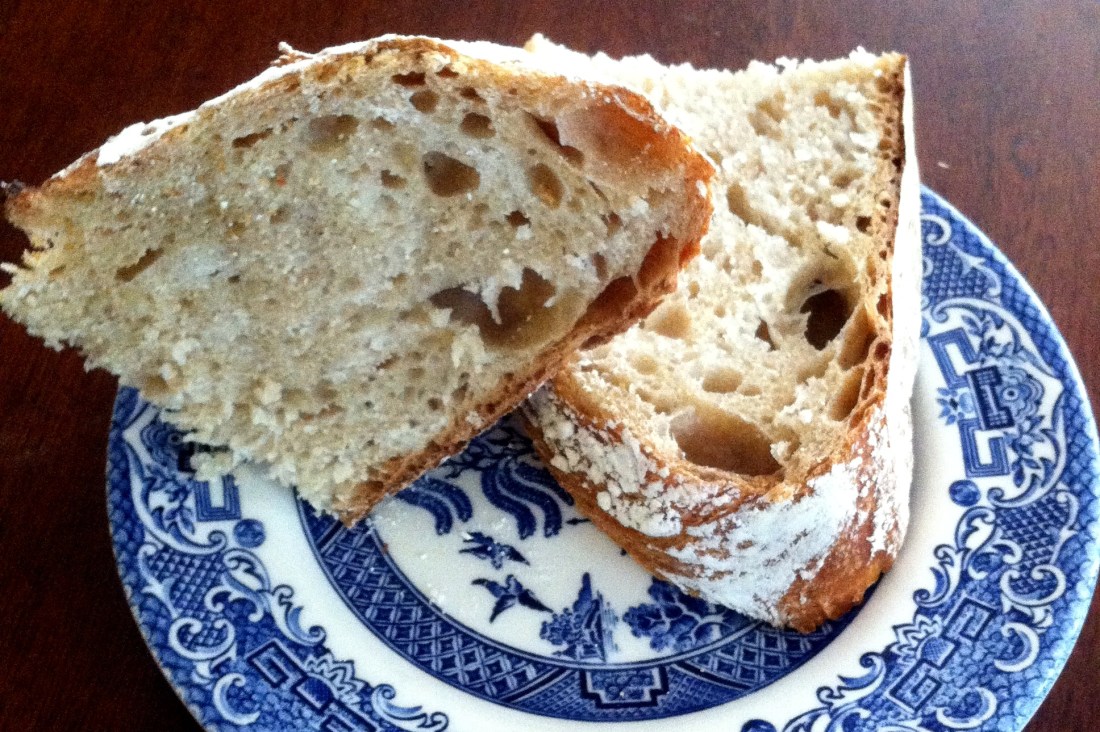
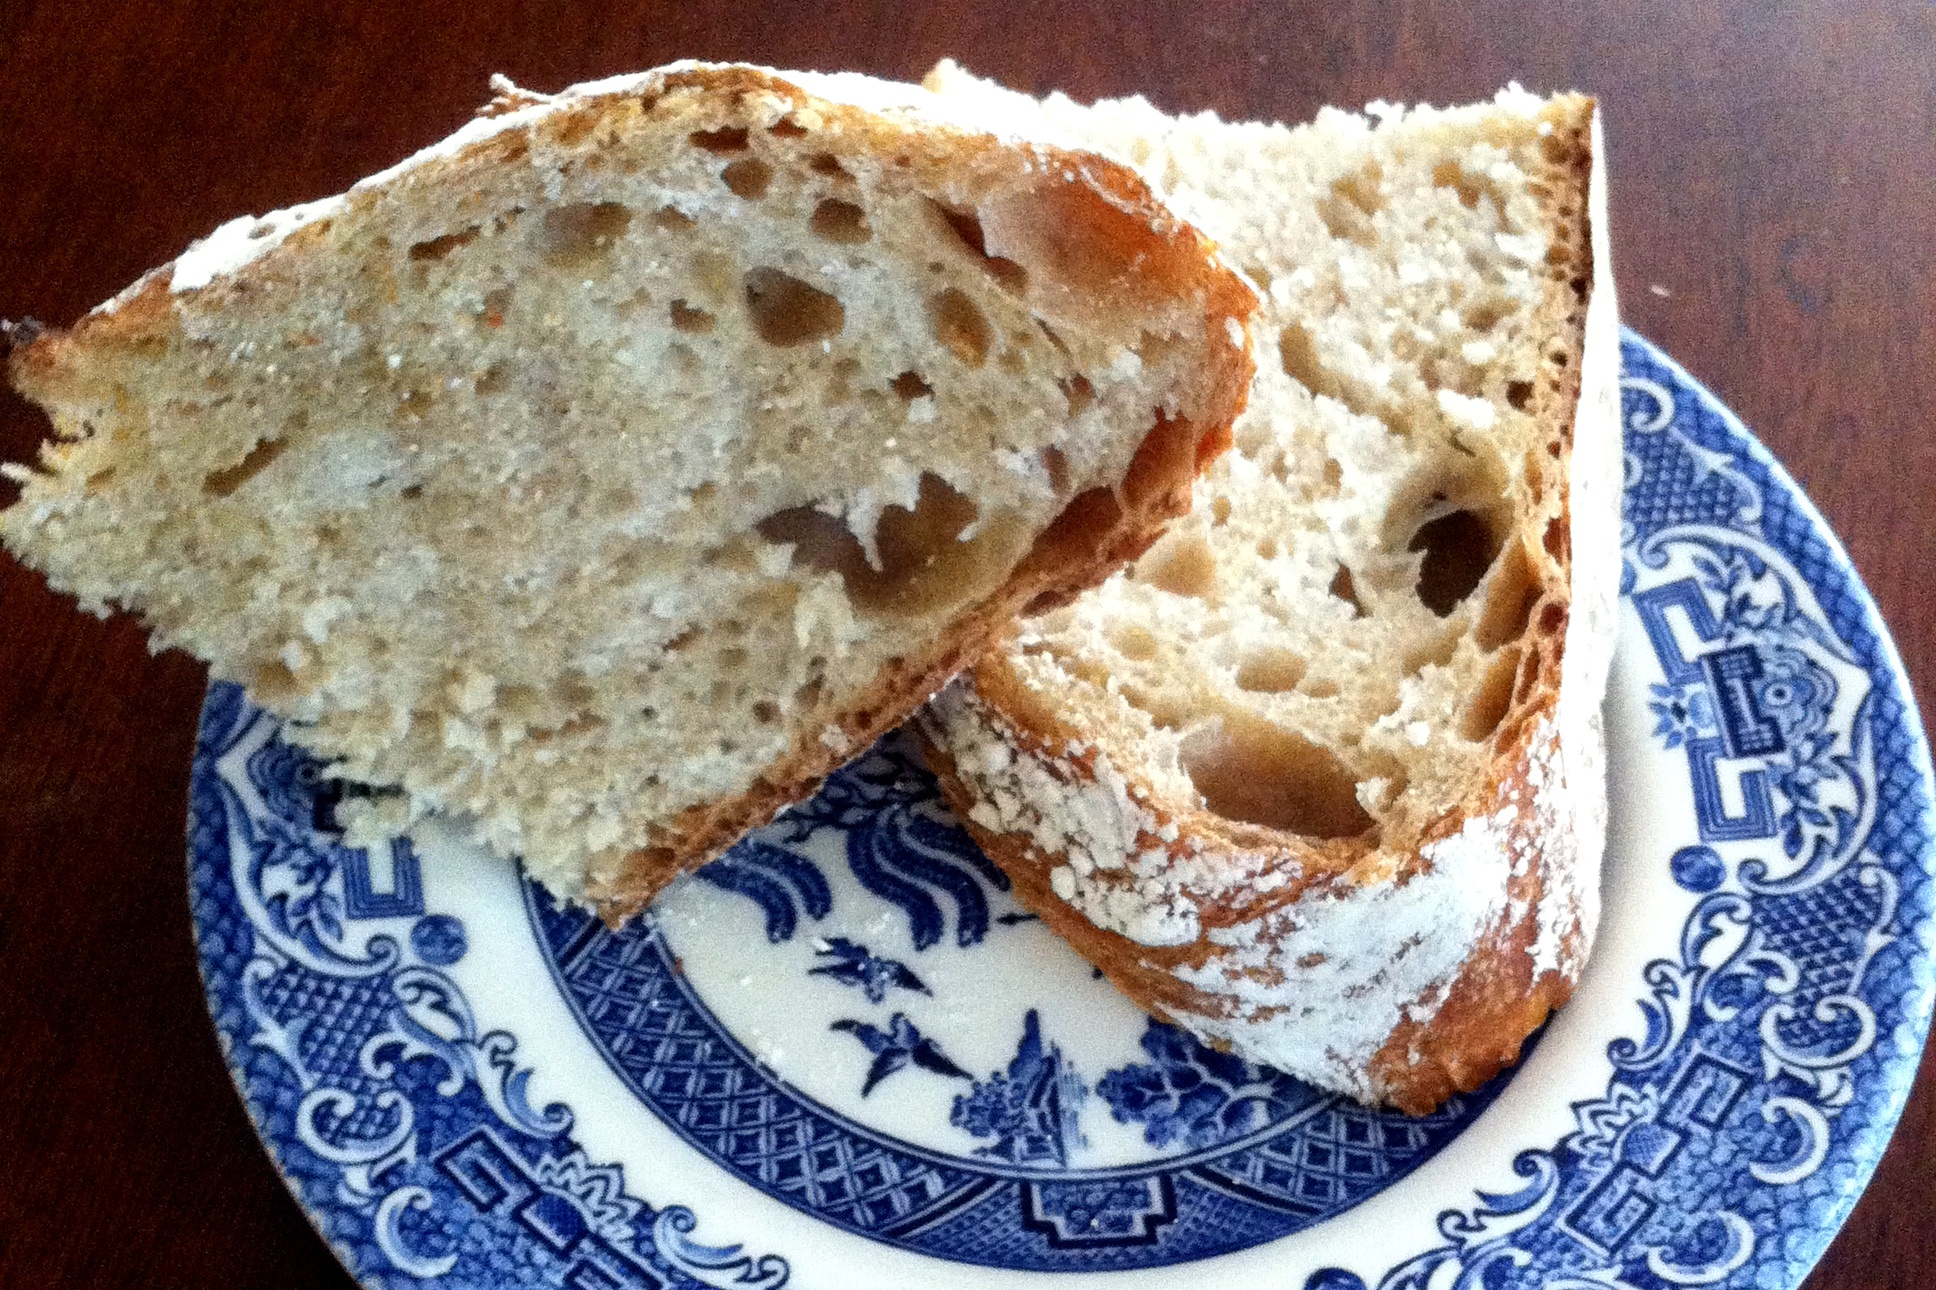
But, the dutch oven is required because it’s what you use to capture the steam from the bread baking and create a fantastic, crispy crust and light, springy bread. The bread we ate the next afternoon was some of the tastiest home-baked bread I’d ever eaten. We devoured it, all two loaves of it, in a matter of a few minutes. The kids loved it. The adults loved it. And we began to contemplate our next foray into artisan bread baking.

Continuing to experiment: success and disappointment

After our initial attempts, I stepped back and read the book. Not cover to cover, but the first four or five chapters where he goes over technique and tools and the basic recipes. I have to say, this is the best book I’ve ever read for explaining the process of making bread. He explains the whys, wheres, and hows… in great, but very interesting, detail. He provides beautiful pictures – with step-by-steps just where you need it and pictures of “this is what this is supposed to look like.” Which is great when you’ve never, ever made bread this way before.

I kept referring back to those pictures over the next two weeks as I made a few more batches of bread. The first I made at home I used my own, home-ground wheat. It was good, but heavy. The next batches I made using store-bought flours. It was much lighter and tastier. The kids and SuperMan loved it. (Ken doesn’t say anything about using home-ground wheat flour. I just decided to experiment with it to see how it would come out)

I want to emphasize that the most important ingredient for making good bread is plenty of time…
Chapter 2: Eight Details for Great Bread and Pizza

Me? I wasn’t quite as in love with it as they were. It didn’t have anything to do with the flavor, though. The flavor was spectacular. Like something you’d get from a fancy bakery. It was the time involved. It took me about 2-3 days to bake a loaf or two of bread. That’s a LONG time. Granted, Forkish does not make any promises of quick bread production. As a matter of fact, he cautions that good bread takes time. A lot of time. And he wasn’t kidding.

Working from home, I originally thought it wouldn’t matter that the process took time, and for the most part, it didn’t. Up until I wanted to plan for fresh-baked bread for a dinner party I was hosting. My head hurt reading his suggested time-tables and trying to back into when I would need to start the process (the day before) in order to have hot bread at 5PM on Sunday night. I gave up. I went to Publix and bought some of their whole grain bread. Everyone was happy. No one knew any different.

Artisan Bread (take 1)

But I was dissappointed. I love, LOVE to bake for people. What’s the point of not being able to share this goodness with folks? I mean, I’m sure I can. I just need to figure out the timelines (or be happy serving not-fresh-out-of-the-oven bread) I am not, by any means, giving up on the book or the recipes. The bread is simply too good to do that. I just need to figure out a timeline that works for me and my schedule.

The good news is most of the time that is required is not active time, but fermenting, rising, and proofing time. You just have to be around when it’s time to move to the next stage.

The bread I made was a pre-fermented dough (poolish) which fermented for 12-14 hours before being mixed into the final dough. From there, the dough had a rise of about 2-3 hours and then a final proof about an hour. So, if you start the poolish at dinner the night before, you can expect to have bread around lunchtime the next day. What I haven’t tried (or figured out) yet is whether or not I can extend that ferment or rise time (or a rest between) so that I can have the dough ready at dinnertime instead. I plan to do just that, but need to wait until I’m not baking for company to experiment.

The poolish bread was excellent. Really, really, really good. And it kept a lot longer on the counter than a traditionally baked loaf of bread. I think it has to do with the fermentation process giving you some extra preservative factor, but the true science of it escapes me. I got close to a week on the counter before the bread started to mold. I think it would’ve gone even longer if it hadn’t been 100% humidity (with 4 days straight of monsoon-type rain) and stored in ziplock bags. That’s a sure recipe for mold if you ask me.

And my plans for the future

Artisan Bread (take 2)

Next, I want to try the Levain breads. Levain is the French word for “sourdough.” I’m thrilled to have an “official” guide to creating these as I’ve been wanting to make sourdough breads for about a year now and have been intimidated by the whole process. With this book, I feel much more equipped and those little ferments don’t frighten me quite as much. No more nightmares of sourdough starters taking over the refrigerator while I sleep. 🙂

Overall, I have to say, I am really glad I got the book. I am looking forward to baking my way through the recipes this year, which include pizza and foccacia recipes as well.

I’ve been continuing to experiment in baking artisan breads and in my next installment I’ll share the other cookbook that’s got me baking and serving artisan breads every.single.night. And loving it.

Stay tuned.


comments-graphic2.jpg

Menu Plan Monday and other things

Happy Monday, y’all.

It’s raining cats & dogs outside and my body is telling me that I need to curl up on the sofa with a good book and take a nap.  Hibernate until the rain is gone. But, since it is supposed to rain for the next THREE DAYS I don’t think hibernating is a good idea. Especially since the girls would not be too happy when I didn’t pick them up at school this afternoon.

IMG_2718

So, I’ll fight the urge to nap and instead focus on my ever-growing to-do list for work… right after I tell you about the fabulous meal we had last night.  I’m bragging, just a little, because I made it, you see. But it truly was scrumptious.

We had friends over for dinner and I made Pasta Fagioli soup. I served it with a hearty salad and some whole grain rolls.  We all pigged out. It was a yummy, filling, make-your-mouth-sing-and-your-tummy-happy kind of meal.

Have you ever had Pasta Fagioli? It’s super easy and super good. And a great way to get some veggies into your body (or your kids’ bodies) in a hearty soup.  My grandpa used to call it “pasta fazool” (read with a heavy Italian accent) or he’d call it “pasta beans.”

IMG_2226

Basically, pasta fagioli is a tomato and beef-broth based soup with beans, vegetables and ground beef.  Only this time I also added a pound of mild Italian sausage. Oh.my.goodness. I’ll definitely be adding it to the recipe from now on.

For dessert, I made the cream cheese coffee cake I’d posted about on my Facebook page (you can follow me here) on Saturday.  Little Bit was my assistant baker and we had a great time making it.

IMG_2714

It’s a very mild cake that’s not too sweet and has a ribbon of cream cheese running through it. It’s topped with a drizzle of a powdered-sugar and milk glaze which adds just the right amount of sweetness to it.

It’s kind of like cheesecake and pound cake got together and had a baby and this is what the baby is.  And since pound cake and cheesecake are two of my favorite desserts, I really like this one!!

IMG_2222

It was perfect with a cup of coffee (or tea, in my case) and we all really enjoyed it for dessert last night.

MPM-Fall

As far as the rest of this week’s menu goes, I’m going to be cooking from my freezer for a few days – using up my stockpile of meats & veggies in there.  Here are a few things I’m thinking about:

  • Meatloaf on Monday – I’ll make little individual meatloaves so they bake faster and everyone gets their own little loaf.
  • Chicken stir fry with rice – ever since I got my rice cooker, I love making a huge batch of rice once a week and then finding different ways to serve it (quickly) for dinner.  This one is a favorite of ours.
  • Big Girl has been begging for some Shepherd’s Pie so I will probably make that one night, too.

SuperMan is working a big “shut down” at work and is going to be gone most of the week – 14 hour days – so I don’t know if I’ll do too many more big meals than that. Cereal and/or pasta nights might creep in as they’re easy and quick to fix and the girls are quite happy with that.

And now I’m off to brew some Tazo AWAKE tea, because I think I’m gonna need that extra jolt to get me going today.


Saturday Sweetness from the Crock Pot

I know, I know, goodies in the crock pot?

I will admit I’ve never successfully cooked very many sweet things in the crock pot. To me, the crock pot is reserved for savory dishes, soups and stews.  But I just had to share this with you.

My neighbor’s mom makes this every year and we are always so thrilled when they bring a little bit over to share with us.  Nana makes the best treats and this one is a particular favorite of mine.  This week, she came to visit (we had “Nana Central” in our cul-de-sac, with two grandmas visiting, Little Bit said.)  and she made a batch.  Luckily we were the recipients of a sample.

crock pot candy

After trying it, my mom said, “We need to make some of this.” So we set out to find the recipe online. We found several blogs and websites with the recipe, even a Redbook article that dubbed it “Trisha Yearwood’s candy” although I do wonder if she really invented the candy herself. It seems to me to be one of those ubiquitous candies that appears every holiday – kind of like fruitcake and fudge. Which, truthfully, is just fine with me, because I LOVE it. (Here’s another link to a source recipe we used as our base.)

It’s sort of a cross between a Payday candy bar and peanut butter fudge.  Which is crazy because even though I swore it had to have peanut butter in it, I found out that it doesn’t!  Not one drop.

The secret ingredient is dry-roasted peanuts. That, and I think, the crock pot.  When you cook this, the layering in the crock pot is apparently critical. I think the roasted peanuts are on the bottom and as they heat up directly on top of the heating elements of the crock pot, they must infuse the chocolates (yes, plural) with the roasted peanut flavor.  What you end up with is so delicious. And, so stinkin’ easy, it’s almost embarrassing.

This will definitely be on my list of goodies to make for our friends this holiday season.  I hope you give it a try.

Crock Pot Chocolate Peanut Candy


2 jars (16 oz.) dry roasted salted peanuts
1 package (12 oz.) semi-sweet chocolate chips
4 oz sweetened Baker’s German chocolate (green packaging), broken into pieces
3 lb (two 24 oz. pkgs.) white almond bark, broken into pieces (some packages of almond bark may have “candy coating” as the name on the package)

Directions

  1. Put ingredients into a 4 or 5-quart crockpot in EXACT order as listed.
  2. Cover and cook on LOWEST setting for 3 hours. DO NOT remove lid!
  3. Turn off and allow to cool slightly.
  4. Mixture will not be melted but will be soft.
  5. Mix thoroughly and drop by teaspoon size cookie dropper or a teaspoon onto parchment paper.
  6. Let cool thoroughly. Makes approximately 100 pieces, depending, of course, on how large you make the pieces.

A few notes:

  • My large crock pot barely held all of this – you need a BIG crock pot.
  • I had to turn it from Low to Warm about 2 hours into cooking as I noticed the white chocolate was starting to turn brown on the sides.
  • I used a tiny ladle to drop this on the parchment paper. We made 100 candies about 3/4 of a ladle full and let it sit on the counter overnight to cool.

crock pot candy

Saturday Sweetness: Harvest Cake

saturday sweetnessI think I have mentioned before that my favorite cake is the Apple Cake that my mom and I make all the time. I absolutely love it.  Not too sweet but just perfect with a cup of tea, or coffee or all by itself.

I found this Autumn Cake recipe on Pinterest and decided to give it a try. I have to say, it’s right up there with the Apple Cake recipe now in terms of my favorites. I’ve made it twice and it was even better the second time, I think.

The biggest difference is that the second time I didn’t put the glaze on.  The original recipe called for a glaze, but to me, it masked the flavor of the cake and was too sweet.  The second time, I left the cake au naturel and didn’t add a glaze. It was perfect.

The first one I made for our friends from church. One of the guys mentioned as he was eating it that it tasted like “Autumn on a plate” and I have to agree.

Give it a try – I think you will agree as well!

harvest cake

Harvest Cake

2 cups all-purpose flour
2 tsp baking powder
1/2 tsp baking soda
2 heaping tsp ground cinnamon
1/4 tsp nutmeg
Pinch of salt
1 tsp ground ginger
1 1/4 sticks (10 tbsp) unsalted butter, at room temperature
1 cup sugar
1/2 cup (packed) light brown sugar
2 large eggs, at room temperature
1 tsp vanilla extract
1 1/4 cups canned unsweetened pumpkin puree
1 large apple, peeled, cored and finely chopped (I used Honey Crisp and Fuji)
1 cup dried cranberries
1 cup pecans, coarsely chopped

Directions:

  1. Preheat the oven to 350 degrees. Butter a 9- to 10- inch (12 cup) Bundt pan.
  2. Whisk together the flour, baking powder, baking soda, cinnamon, nutmeg, salt and ground ginger.
  3. In a large mixing bowl, beat the butter and both sugars together at medium speed until light and fluffy.
  4. Add the eggs one at a time, and beat for 1 minute after each addition.
  5. Beat in the vanilla.
  6. Reduce the mixer speed to low and add the pumpkin, chopped apple.
  7. Still on low speed, add the dry ingredients, mixing only until they are incorporated.
  8. Finally, gently stir in the cranberries and pecans.
  9. Scrape the batter into the pan and smooth the top with the rubber spatula.
  10. Bake for 60 to 70 minutes, or until a thin knife inserted into the center of the cake comes out clean.
  11. Transfer the cake to a rack and cool for 10 minutes before unmolding, then cool to room temperature on the rack.
  12. DEVOUR!

comments graphic2

Comfort Food at it’s Best: Chicken & Dumplings

Y’all, I am really here. I promise.

It’s been one of those weeks (again) – Big Girl is sick – 100+ fevers for three days now. I’ve been sick.  Work is crazy.  Life is nuts.

But we’re surviving, we’re hangin’ in there.  I’m just remembering my priorities and focusing on those and letting the rest slide.  Like cleaning my house. (which is really starting to drive me nuts. I hate dirty floors.)

Tonight I made something that is one of my family’s favorite comfort food dinners.  Chicken & Dumplings.  It started off as a copycat recipe I found for Cracker Barrel chicken & dumplings, but I’ve slowly made it my own and I thought I would share it with you all here.

It’s so good. It is not a quick recipe to make, though.  This one takes me a few hours to do – so plan your time accordingly.  It’s one that you can’t really rush.  You could, however, do it in stages and just finish the last part off on the day you plan to eat it.  Even then, though, you need about an hour for the dumplings to cook properly.  Un-done dumplings = not good.

Chicken&Dumplings - Page 051

I have chicken thighs/legs written in the recipe, but I will tell you that I’ve made this with whatever chicken I’ve had in my freezer.  Thighs, legs, breasts, miscellaneous parts.  It all works out. I think the thighs are the best because they seem to have a better flavor and don’t dry out like the breasts do.  Also, I use bone-in whenever I can. Then you get the goodness in your broth from the bones and deboning a few thighs is not really a big deal – they usually just fall apart anyway.

I also use whole wheat flour for my dumplings, but you can use whatever you would normally use. I have used white flour before, but I don’t stock that in my pantry anymore, so I make it with whole wheat. The family doesn’t know the difference.

And, one other thing – when you pour the milk into the dumplings, don’t just dump it all in there at once. As I’ve said before, doughs (like breads and dumplings) are humidity sensitive. You may need more or less depending on how humid it is in your house that day.  I pour a measuring cup and then just add a little at a time until it is the right consistency.

IMG_2245[1]

What is the right consistency?  Well, it’s a good, cohesive dough, that is a little bit tacky to the fingers but not super-sticky.  If you get too much milk in there, just add a little more flour until you get it right. It’s not rocket science. It’s easy.  And once you make your own dumplings you won’t ever want to buy store-bought ones again. They are so good.

Chicken&Dumplings - Page 050

So, while we are battling our bugs and surviving the myriad crises, we’ll comfort ourselves with a little bowl of this – and maybe again tomorrow for lunch. It’s even better warmed over.

Please do let me know if you try it – and how you like it. I always wonder if people actually try the recipes I share or if I’m just slowly building an online cookbook for my own reference…

Chicken & Dumplings


2 pounds of chicken thighs/legs (bone in, skin on is fine)
2-3 stalks of celery (with the leaves on the top)
~1/2 – 3/4 cup of carrots, chopped finely
3-4 chicken bouillon cubes
Houston House Seasoning
1 tsp minced garlic
water
salt/pepper

For the Dumplings:

1 – 1 1/2 cups milk
2 cups flour (all purpose)
1 heaping tbsp baking powder
1 tsp salt

  1. Fill a large stock pot with water.  Add the bouillon, about 1 tsp salt, 2 tsp pepper, and start to bring to a simmer.
  2. Chop your celery and carrots. Add to water.
  3. Generously season the chicken with the house seasoning (onion powder, garlic powder, salt & pepper)
  4. Add chicken to water.
  5. Bring to a boil and let simmer for 2-3 hours or until chicken is falling off of the bone.
  6. Remove chicken from broth and debone, discarding the fat, gristle and any skin. Cut into bite-sized pieces and add back to the broth.
  7. To make the dumplings, put the flour, baking powder and salt in a mixing bowl.  Gradually add milk until you have a slightly tacky (not sticky) dough.
  8. Let the dough rest for about 5 minutes. While the dough is resting, bring your broth to a rolling boil.
  9. Roll out the dumplings. I usually do two batches (half of the dough at one time) and generously flour my counter.  I roll them pretty thin and then use a pizza cutter to make dumplings about 1/2 inch wide by about 1 inch long.
  10. As the broth is boiling, drop the dumplings in.  Continue dropping them in, stirring as needed to get them submerged, until all of the dumplings are in the pot.
  11. Reduce to medium or medium-low heat and let simmer for about an hour. I leave the lid on the pot, but at an angle so that it does not boil over.

Serve with biscuits, saltine crackers or just in a bowl and devour!

Note: If you make this in stages, you could do your chicken, save the broth and deboned chicken and then re-assemble & bring to a boil while you make your dumplings at a later date.

I also have a crock-pot chicken & dumplings recipe you could try if you are not going to be home during the day and want some goodness when you get home.

Chicken&Dumplings - Page 050

Baked Ravioli


Well, that was fun (not) –

I’ve been sick for the past two days with a stomach bug – the kind that reminded me of the worst morning sickness days of my pregnancies.  I lived off of saltine crackers, plain bagels and ginger ale for two and a half days. Not sure if it was a virus or food poisoning, but it was most definitely not fun and I’m so glad I’m feeling better this morning.

I have a yummy and easy recipe to share with you.  This is one you can literally have in the oven in 10 minutes if you have the ingredients on hand – and dinner in a half hour. Super simple.

Baked Ravioli

I made it one night last week when I was crazy busy with work and needed something filling and fast.  I served with a salad and garlic bread and the family loved it.

It’s kind of like a lazy-woman’s lasagna.  But tasty in it’s own right.  And, ironically, the little one doesn’t like lasagna, but loved this.

Baked Ravioli

1 large package prepared three-cheese ravioli
1 quart marinara sauce (you can use jarred, I used leftovers)
1 pound ground beef
Italian Seasoning
Houston House Seasoning
2 cups mozzarella or three-cheese Italian blend

  1. Preheat oven to 350
  2. Brown the ground beef. Season with Houston House Seasoning & Italian Seasoning.
  3. In a large casserole dish (deep dish is best) put about 1/2 cup of marinara. This will coat the bottom of the pan so the pasta won’t stick.
  4. Add in one layer of ravioli. (if they are frozen, that’s fine)
  5. Spread about half of the ground beef on top and cover with some more marinara.
  6. Add in another layer of ravioli and top with the remaining beef and marinara.
  7. Top with cheese
  8. Bake, uncovered, about 20 minutes.

Let it sit for about 5 minutes before serving.

IMGP4506

Serve with a salad & garlic bread.


Chicken Noodle Soup Casserole

My menu plans went out the window this week when the girls got sick.  I needed comfort food, and fast.  I had pinned this recipe and decided to try it out – I figured it might be comfort food-y enough to give the girls some goodness in their sick little bodies.

I mean, doesn’t that just look delectable?

Of course, I made it my own with a few modifications and I thought I’d share the finished product with you here.  The verdict from the family?  Well, the sickos weren’t crazy about the crackers on the top but SuperMan and I absolutely loved it.  And the leftovers for lunch are even better after the flavors have settled in together even more.

So, this one comes with the highest of recommendations from our family.  Next time I make it I’ll only put crackers on half, but that will be the only change.  It is really, really good.

chicken noodle soup casserole

Chicken Noodle Soup Casserole

4 boneless skinless chicken breasts
Houston House Seasoning
minced onion (dried)
minced garlic
Mrs. Dash (garlic variety) if you have any, not necessary if you don’t
2 bouillon cubes (chicken)
1/2 pound of egg noodles (uncooked)
1 can cream of mushroom soup (I used low fat/low sodium)
1 can cream of chicken soup (I used low fat/low sodium)
1 cup sour cream (1 small container)
1-2 cups Mexican blend shredded cheese
1 sleeve butter crackers (like Ritz) crushed
1/2 cup butter (1 stick)

  1. Season chicken breasts generously with Houston House Seasoning and Mrs. Dash.
  2. In a large stock pot, place the chicken breasts, bouillon cubes, about 1-2 Tbsp of minced onion and 1-2 Tbsp of minced garlic.  Cover with water and bring to a boil.
  3. Cook chicken in water for about 1-2 hours or until tender.
  4. Pull chicken breast out of water (reserving water) and shred. Set aside.
  5. Bring the chicken broth back to a boil and add the egg noodles.  Cook until al dente.  You do not want to overcook so they will not be soggy in the casserole. A little “firm to the tooth” is better.
  6. While noodles are cooking mix the cream soups & sour cream in a large bowl.  Add about 1-2 tsp of Mrs. Dash and 1-2 tsp of Houston House Seasoning and mix well.
  7. Mix in the chicken.
  8. Pull noodles from the water (I saved the broth & froze it for another use later) and mix in gently with the chicken/soup mixture.
  9. Place in a greased casserole dish – 9×9 or larger.
  10. Top mixture with 1-2 cups of cheese. You want to see noodles peeking out. It should not completely obliterate the casserole. It’s just a garnish, so to speak.
  11. In a small pot, melt the butter. While butter is melting, crush the crackers if you have not already. (good stress reliever)
  12. Remove melted butter from heat and add the crackers to the butter and mix well.
  13. Sprinkle the crackers on top of the cheese, spreading in a thin layer.
  14. Bake at 350 degrees for about 30 minutes. (uncovered)

Let sit for about 5-10 minutes before serving so you don’t scorch anyone’s mouth.

IMGP4514

ENJOY!

comments graphic2

Saturday Sweetness: Apple Cake


Hello, Sweet Things!Saturday Sweetness

Happy Saturday to you!  It’s an overcast, gloomy day here in our neck of the woods… looks like it will be rainy around here for the next four or five days. I’m not complaining, though, because it means the weather will cool down even more and that means I might get my first fire in the fireplace for the season! Yippee!

Today I’m going to be spending some time in the kitchen – I’m planning to make a batch of my beef stew for a get together with some friends.  We’re not getting together until tomorrow evening, but I’m making it today so the flavors can meld and be even tastier by tomorrow.  I’ll cook it in the crock pot and then I can stick the crock in the fridge until it’s time to warm it up tomorrow.

I’m also going to make this awesome Apple Cake recipe. I’ve shared it with you before (years ago) but I thought I’d share it again. To me, it’s the quintessential fall cake recipe. My mom and I make it many times throughout the fall. Baking this sort of signals the beginning of the fall baking season to me.

It’s so simple to make and you probably have most of the ingredients on hand… and it is so worth it. It tastes super good.

I’m off to the kitchen – well, I am as soon as SuperMan relinquishes control in there. Right now he’s making our weekly Saturday breakfast smorgasbord and since it is one of the highlights of our weekend, I’ll just stay out of his way and let him go.  THEN I’ll get in there and do my thing the rest of the day. Smile

Here’s the recipe.  I hope you enjoy.

APPLE NUT CAKE

1 cup vegetable oil
2 cups sugar
4 large eggs
3 cups all-purpose flour
1 cup chopped pecans (optional)
1/2 tsp salt
1 tsp baking soda
2 tsp vanilla extract
3 cups apples, peeled & chopped (the smaller the pieces the better)
1 cup raisins

  1. Cream oil, sugar.
  2. Add eggs and vanilla.
  3. Sift flour with salt and baking soda.
  4. Slowly add (in 1/2 cup increments) to wet ingredients.
  5. Add pecans, raisins and apples.
  6. Pour into greased Bundt pan.
  7. Bake at 350 for one hour.


Around Here: Success and not quite success in the kitchen

I love trying new recipes.

This is new for me as I used to be very hesitant to do that. If I went to the trouble of cooking something (and I was hungry) I wanted guaranteed success. I wanted to know my time, effort and ingredients were going to reward me with yumminess to enjoy.

I don’t know when this changed – maybe when I started baking more (years ago) or when – but it has changed indeed.

Now, it is fun to start with a base recipe as an “inspiration” for me and get in the kitchen and try to come up with something totally new for us to try.

Sometimes that yields delicious results.  Sometimes disasters. And sometimes things are just “meh” – they’re edible, they’re not terrible, but they aren’t necessarily things I’d repeat without some major reworking.

Yesterday was one of those days. I had this craving for some cheese tortellini in a vegetable soup. I had no set recipe in mind, but I knew what I wanted taste-wise.

IMG_2131[1]

I ran out to the store in the morning after taking the girls to school because tortellini is not something I normally stock in my pantry.  After my dash to get supplies, I decided to try doing things in the slow cooker rather than on the stovetop.

So, in everything went… Chicken broth, some stewed tomatoes, a bag of frozen “Italian” veggies (which translates to zucchini, squash, bell peppers, onions, carrots, butter beans), some other random veggies that I had in the freezer (like some shredded spinach) a bouillon cube, some garlic, copious amounts of Italian seasoning, etc.

It simmered and bubbled all afternoon.  When it was close to time to eat I cooked the tortellini in a pot of simmering water. I wasn’t sure if the girls would like the soup or the tortellini so I figured I would not mix the two unless they chose to.

I also grilled some chicken strips I had marinated in balsamic vinaigrette to serve in the soup or alongside with a salad if the soup was a bust.

I have to say, I’m glad I did that.

The soup turned out to be one of those “meh” kind of meals. It wasn’t bad, but it wasn’t great, either.  Sadly, the best part of it were the tortellini (and they were store bought so they shouldn’t have been the tastiest part as far as I was concerned)

SuperMan and I ate it.  The Big Girl said “NO” and the Little One ate the tortellini out of the soup and nothing else.

Oh well.

These type of nights I’m grateful for Velveeta Mac & Cheese and instant pancakes (yes, I serve those things, just not very often!)  At least I know everyone had something to eat for dinner – even if it wasn’t what I had planned.

Big Girl said it was the “weirdest dinner ever” because she ate grilled chicken with pancakes.

We also tried a new dessert, which, if you follow me on Facebook you saw the link to yesterday. It was about the same in terms of our liking it.  It wasn’t bad, but I probably wouldn’t make it again.

IMG_2133[1]

It reminded me of the lava fields in Hawaii.

Oh well, nothing ventured, nothing gained.

And it was only one meal…

However, I didn’t satisfy my craving for the soup I had in mind.  I may try something again one day (maybe a minestrone base?) but I’ll have to wait until the kids forget about last night’s experimental dinner first. Smile