Saturday Night is Pizza Night

When I grew up, lunch on Saturdays was always hot dogs (sometimes sandwiches) and dinner was often pizza.  Which was perfectly fine with me because I absolutely love pizza. Sometimes, Mama would make homemade pizzas, using leftover spaghetti sauce and we’d get to top our own pizzas. Those were always my favorite because they were meaty and heavy with my favorite toppings.

We’ve been making homemade pizzas for a while now. I had shared a grilled pizza dough recipe a while ago, which is one of the standard recipes we used all of the time on the grill and in the house.  However, because I’m not one to leave things alone, I’ve continued to fiddle with the recipe and research more recipes and I’ve come up with a pretty darn good recipe that we’ve been using for the past few months.

This recipe makes two fourteen-inch (sort of) pizzas, or four “personal” sized pizzas if you divide the dough into smaller pieces.  One of the things I love about this dough is that it bakes up light and crispy – especially if you use a pizza stone and a screaming hot oven.  IMG_2304

A few things to know:

  • Using a pizza stone makes a MUCH better crust.  And pre-heat the stone while you’re pre-heating your oven.  Then the crust will crisp quickly when it hits that hot stone.
  • Cook in a HOT (HOT!) oven – I usually cook mine at 500 degrees (F).  If I didn’t set off all of the safety mechanisms on my stove and range hood, I’d do it hotter, but I’ve learned that it’s not worth having all the alarms go off for 50 degrees more heat. Smile with tongue out
  • Rising time is important. Plan your meal prep with enough time to allow at least 45 minutes for the dough to rise. You really can’t rush the little yeasties. Patience will pay off.
    IMG_2293

    ^^ before the rise ^^

    IMG_2294

    ^^ after 45 min rise time ^^

  • Get some grits. I know this sounds crazy, but we have learned (the hard way) that your pizzas will not slide off of a peel or cutting board very well once the dough is a little warm from rolling it out and then heavy from adding the toppings.  Last week we had cheese, dough, etc. all over my oven door and floor because of an uncooperative pizza that didn’t want to slide off of the peel.
    Grits (corn meal) under your dough (before you top your pizza) will act like little marbles and let the pizza slide right off of the peel.  And they add some crunch to your crust!
  • If you don’t have grits (you’re not from the South, are you?) then you can always roll your dough out on parchment (not wax) paper and bake the pizza on the parchment paper.  You just have to be careful because the parchment gets really crispy (brittle) in the oven and makes it a little tricky to pull the pizza out of the oven.
  • You can make this in a stand mixer or in your food processor. I’ve done it both ways. It usually depends on which appliance happens to be out on my counter at the time (or which is clean and not dirty!) Heck, you can even mix this by hand if you want. It’ll be a good workout for you. Winking smile
  • We usually get two meals (at least) out of this pizza-making session. One the night we make them and then one for lunch or supper a few days later. And it’s WAY cheaper than takeout pizza (and SO MUCH tastier!)

Pizza Dough

1 cup very warm water
2 1/4 tsp yeast
1 Tbsp honey
2 tsp salt
2-3 Tbsp grated Parmesan cheese (like Kraft Parmesan)
2 Tbsp olive oil
1 Tbsp Italian Seasoning
~3 Cups flour (I used King Arthur White Whole Wheat flour)

  1. In a mixing bowl, combine water, yeast & honey. Let the yeast “bloom” for about 5 minutes.
  2. Add the oil, half of the flour (1.5 cups) and mix with a dough hook.
  3. While mixing, add the Italian Seasoning, salt and gradually add the remaining flour a little at a time until the dough begins to form a ball and pull away from the sides of the bowl.
  4. Knead for 6 minutes.
  5. Once the time has elapsed, remove the dough hook and form the dough into a ball.
  6. Lightly oil the mixing bowl and put the dough ball back in.  Cover with a towel and let rise in the for 45 minutes to an hour. (preheat your oven while dough is rising)

In Action

Here’s our little pizza making session Saturday night:

PL 4x6 print pages - Page 061

^^ Rolling out the dough – topping the kids’ pizza ^^

PL 4x6 print pages - Page 062

^^ SuperMan making his monster pizza with 45 toppings. I swear it weight 10 pounds! ^^

IMG_2309

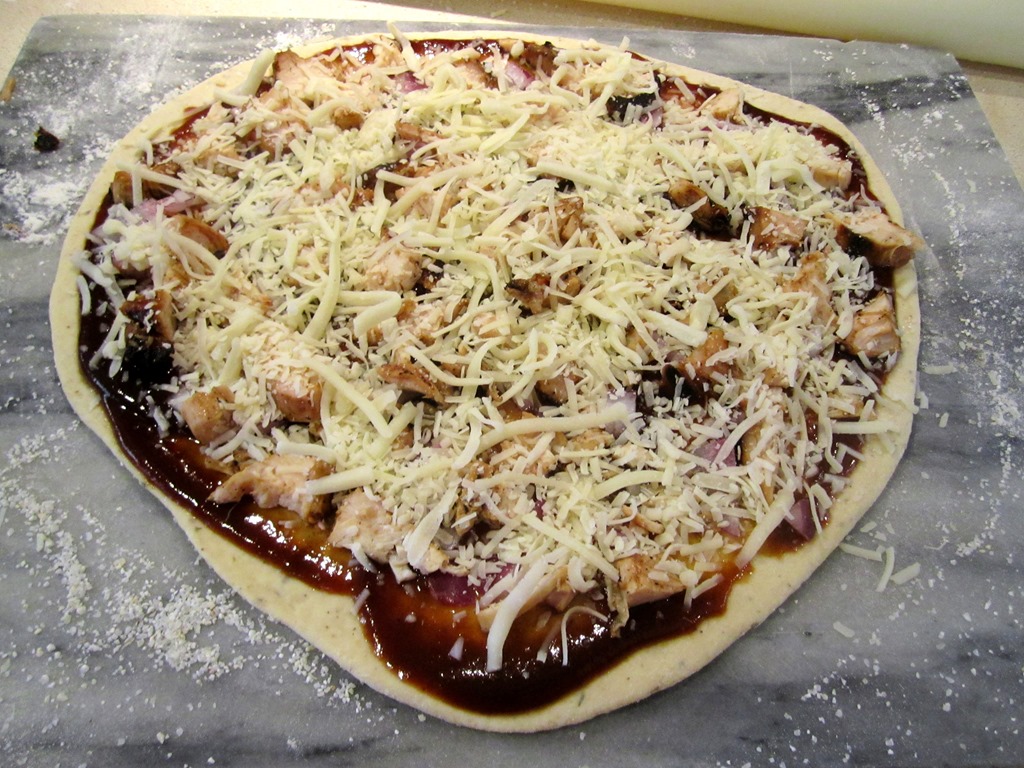
^^ Topping my BBQ Chicken pizza. ^^

IMG_2311

^^ The masterpiece ready for the oven. ^^

IMG_2313

^^ SuperMan says quit taking pictures and let’s eat! ^^

Wonderful Waffles for Supper

I’ve gotten on a “breakfast for dinner” kick.

It’s super easy, inexpensive, and lets you enjoy some breakfast-y things that you would not normally have time to make during the week at breakfast time.

Like waffles.

You see, I’m not a morning person. Never have been.

And so, my kids suffer at breakfast because I’m struggling most mornings to be vertical and coherent for them.  Cooking fantastical breakfasts is just not going to happen.

But cooking an awesome “breakfast” for dinner? Totally do-able.  I’m awake at 5PM, just not so much at 5AM.

So, we’ve been making breakfast for dinner the past few weeks… It’s sort of become our Thursday night dinner tradition since the kids aren’t wild about leftovers and Thursdays are a busy day with dance classes, etc.

I’ve been hunting for a good waffle recipe. Something that was a “scratch” recipe and not from a box.  Last week we tried one that was just okay. Not great, and not something we wanted to try again –

And so this week I went looking for new recipes to try.

What I found was that there are not too many variations – eggs, flour, sugar, etc.

What did differ was whether the egg whites were whipped or not.  The first recipe we had tried did not have the whipped egg whites and the waffles were flat – in taste and volume. I wondered if whipping would make a difference, but, quite honestly, it seemed like a lot of extra work. Was there really a payoff?

Then I found a recipe on Food Network’s website for “Waffles of Insane Greatness” which are from Aretha Frankenstein’s restaurant in Tennessee. Right off the bat I was intrigued – the name of the waffles, the name of the restaurant and the fact that it was a southern recipe.  Then I saw that you don’t have to whip the egg whites. Score!!

I had also found this recipe for the Very Best Waffles (they claimed) – I printed it out and compared to the Insane waffle recipe.  Pretty much the same with the exception of the addition of some spices.

I had one other requirement for my waffles that no recipe included but that was non-negotiable for me. They  had to have some added protein.  I couldn’t handle the carb-fest myself and wanted to be sure the family got a little more protein in their dinner, even if I had to sneak it in. I figured I’d improvise that part.

I headed into the kitchen to give it a go…

waffles

They turned out, well, wonderful…

So much so, that, as I’m typing I’m nibbling on one, cold & dry, and yet it’s still good.

The kids loved them, SuperMan devoured them, and after I ate one, I collapsed on my rocking chair in a blissful carb coma.  (but it was worth it)

So, give these waffles a try – it’s a fast and easy way to whip up some supper one night without a big ole mess in the kitchen.  Serve them up with some bacon, fresh fruit and you’ll have your family singing your praises…

Wonderful Waffles

Ingredients:

Dry ingredients:

3/4 cup all-purpose flour
1/4 cup cornstarch
1/2 tsp baking powder
1/4 tsp baking soda
1/2 tsp salt
1 1/2 tsp sugar

Wet ingredients:

1 cup buttermilk (or whole milk mixed with about 1 1/2 tsp white vinegar to make 1 cup of “buttermilk”)
1/3 cup vegetable oil
1 egg
1 tsp vanilla extract

Optional Ingredients:

1/2 tsp almond extract (optional)
1/8 tsp ground nutmeg (optional)
1/4 tsp ground cinnamon (optional)

2 scoops vanilla protein powder

Instructions:

1. In a mixing bowl, combine the dry ingredients.

2. If using, add the cinnamon & nutmeg to the dry ingredients.

3. In a measuring cup, combine the buttermilk, oil, extracts and egg. Combine gently.

4. Pour liquid ingredients into the dry ingredients and use a whisk to combine.

5. Let the batter sit for 5-10 minutes while your waffle iron heats.

6. Spray your iron with nonstick cooking spray and ladle some batter onto the iron. Bake them as per the instructions for your iron.

7. Serve immediately or keep warm in preheated oven until ready to serve.

A couple of things to note:

– I doubled the recipe and got 10 waffles. Depending on how many people you’re feeding you may need to double as well.

– I think next time I will preheat my oven to 200 degrees, as the one recipe suggests, and put the finished waffles on the rack in the oven to stay warm until they’re all finished being made. That way we can sit down and eat together rather than in shifts as I finish up waffles.

– The almond extract, nutmeg and cinnamon are completely optional but I put them in and I think it added a great flavor. Big Girl was not crazy about the nutmeg. I may leave it out next time since I’m the only one who is really nuts about nutmeg around here.

– The protein powder is also optional and using it only enhances your protein content of your meal. You don’t need to add any extra liquid if you it. (or take any away if you don’t)

– I had a few left after we ate dinner and I put those in a ziplock bag in the refrigerator for breakfast the next day.  I reheated them in the toaster oven.

Cream Cheese Coffee Cake

I stumbled across this recipe on Pinterest and have made this coffee cake several times now  – with rave reviews every single time I make it.  Even my kids love it.

Coffee Cake

While the original recipe was really good by itself, I thought I’d share the recipe the way I make it, too.

Here you go –

Cream Cheese Coffee Cake

Filling:

2 Packages Neufchatel Cheese, softened (low-fat cream cheese)
1/2 cup sugar
1 tsp vanilla extract
1 tsp almond extract
1 egg

Cake:

1 cup sugar
1 stick (1/2 cup) butter
1 cup sour cream (low fat is fine)
4 eggs
1 tsp vanilla extract
1 tsp almond extract

1/2 tsp salt
1/2 tsp baking soda
1 tsp baking powder
3 cups all-purpose flour

Streusel Topping:

1/4 c sugar
1/4 c flour
3 Tbsp butter (chilled & cubed)

Glaze:

1/4 cup (give or take) powdered sugar
1 – 2 tsp milk

  1. Make the filling: In a small bowl, using a hand mixer, mix the filling ingredients until they’re well combined. Set aside.
  2. Preheat oven to 350F.
  3. Spray/Grease a 9×13 Pyrex cake dish.
  4. Make the cake:  In a mixing bowl, cream the sugar & butter.
  5. Add the sour cream and extracts.
  6. Add the eggs, one at a time, mixing until combined.
  7. Add the salt, baking soda and baking powder.
  8. Add the flour gradually (so you don’t have a flour storm in your kitchen)
  9. Spread about half of the cake mixture in the bottom of the 9×13 pan. You may need to use an offset spatula to spread the batter.
  10. Pour the filling on top of the batter in the pan.  Using a spatula, spread to form an even layer across the batter.
  11. Take the remaining batter and add to the top of the filling. You will need to carefully spread this across the filling to form a third layer.
  12. Make the streusel:  In a small bowl, mix the streusel ingredients with a fork. Or, if you have a small food processor/chopper, mix the ingredients in that. It is important that the butter be COLD to properly form the streusel.  You will end up with oatmeal-like texture if your butter is the proper temperature.
  13. Sprinkle the streusel on top of the batter.
  14. Bake 45 minutes at 350 degrees .
  15. Cool completely on a wire rack (about an hour or so)
  16. Make the glaze:  Combine glaze ingredients in a small bowl or measuring cup. Add milk SLOWLY until you get the desired, drizzly texture. Depending on humidity you will need more/less milk.
  17. Store in a cool place in a Tupperware or sealed container.  Refrigeration is probably a good idea in a hot climate.

This tastes absolutely divine with a cup of Earl Grey or coffee. And it’s not too shabby with a cup of cold milk, either. As a matter of fact, it’s pretty darn good no matter how  you serve it – even if you eat it out of your hand as you dash out the door to go somewhere. Not that I’ve ever done that or anything… wink, wink.

Wintertime Comfort Food

It’s rainy and cold here today – we’ve gone from 60-70 degrees on Tuesday to much cooler temperatures today.  I thought I’d share some of my favorite recipes for comfort foods for cold, blustery days like today.  Some of these are crock-pot recipes and some are stovetop, although quite a few of the stovetop ones I’ve done in the crock pot as well.  These are old standby recipes that I turn to again and again for something warm, hearty and filling for my family.  An added bonus is that with most of them I can sneak some veggies in without too much protesting from the troops.

Beef Stew: This recipe originated from one of those little recipe books you pick up at the checkout in the grocery store. I’ve tweaked it and made it my own and we love it.  It’s also great for feeding a crowd. I usually make this in the crock pot but there is no reason why you couldn’t simmer it on the stove if you don’t have a crock pot.

IMG_2226

Pasta Fagioli: This is one of my all-time favorites.  It just screams “Italian comfort food” to me.  It’s super-easy and can be done in the crock pot or on the stovetop.

French Onion Soup: I don’t know about you, but a rainy, cold day is just perfect for a big bowl of French Onion soup.  My girls have not yet learned to appreciate this soup, so we don’t get to eat it around here as frequently as I’d like to.  But it is always something I order when I’m traveling for work. It makes me feel warm and cozy when I eat it and it’s great for sipping while watching TV in a hotel room. I saw this recipe on a recent episode of Cooks Country (one of my all-time favorite cooking shows – they are the real deal when it comes to cooking shows) and I am thinking I might try it soon. Love the fact that it is slow-cooker friendly.

Chili should be on the list, too, and a good white chicken chili is another recipe I love to make in the cool weather.

My hearty beef chili is another family favorite and I usually serve it with elbow noodles on the side so that the Little Bit can have “chili mac” that she loves. (Here’s my veggie chili recipe just to round out the offerings)

And, of course, you always need a good vegetable soup recipe.  This one I call clean out the crisper” soup because I never know what I’m going to throw in there – it just depends on what I have that needs to get cooked in my veggie drawer.  It’s great for using up leftovers and always tastes so good.

Chicken&Dumplings - Page 050

If you are Southern, then you know a comfort food list is not complete without a recipe for Chicken & Dumplings.  As a matter of fact, I’ve got a hankering for these. Might just make some this week.

Finally, my favorite Chicken Tortilla Soup recipe.  I love the chili-chicken-ness of it and the fact that you can eat it with tortilla chips or all by itself.  If you’re not a fan of Velveeta, here’s another tortilla soup recipe (my original one) without the extra cheese.

I hope these recipes help when you’re on the hunt for something warm and tasty for your family. What sorts of comfort foods do you gravitate towards in the wintertime?


Menu Plan Monday and other things

Happy Monday, y’all.

It’s raining cats & dogs outside and my body is telling me that I need to curl up on the sofa with a good book and take a nap.  Hibernate until the rain is gone. But, since it is supposed to rain for the next THREE DAYS I don’t think hibernating is a good idea. Especially since the girls would not be too happy when I didn’t pick them up at school this afternoon.

IMG_2718

So, I’ll fight the urge to nap and instead focus on my ever-growing to-do list for work… right after I tell you about the fabulous meal we had last night.  I’m bragging, just a little, because I made it, you see. But it truly was scrumptious.

We had friends over for dinner and I made Pasta Fagioli soup. I served it with a hearty salad and some whole grain rolls.  We all pigged out. It was a yummy, filling, make-your-mouth-sing-and-your-tummy-happy kind of meal.

Have you ever had Pasta Fagioli? It’s super easy and super good. And a great way to get some veggies into your body (or your kids’ bodies) in a hearty soup.  My grandpa used to call it “pasta fazool” (read with a heavy Italian accent) or he’d call it “pasta beans.”

IMG_2226

Basically, pasta fagioli is a tomato and beef-broth based soup with beans, vegetables and ground beef.  Only this time I also added a pound of mild Italian sausage. Oh.my.goodness. I’ll definitely be adding it to the recipe from now on.

For dessert, I made the cream cheese coffee cake I’d posted about on my Facebook page (you can follow me here) on Saturday.  Little Bit was my assistant baker and we had a great time making it.

IMG_2714

It’s a very mild cake that’s not too sweet and has a ribbon of cream cheese running through it. It’s topped with a drizzle of a powdered-sugar and milk glaze which adds just the right amount of sweetness to it.

It’s kind of like cheesecake and pound cake got together and had a baby and this is what the baby is.  And since pound cake and cheesecake are two of my favorite desserts, I really like this one!!

IMG_2222

It was perfect with a cup of coffee (or tea, in my case) and we all really enjoyed it for dessert last night.

MPM-Fall

As far as the rest of this week’s menu goes, I’m going to be cooking from my freezer for a few days – using up my stockpile of meats & veggies in there.  Here are a few things I’m thinking about:

  • Meatloaf on Monday – I’ll make little individual meatloaves so they bake faster and everyone gets their own little loaf.
  • Chicken stir fry with rice – ever since I got my rice cooker, I love making a huge batch of rice once a week and then finding different ways to serve it (quickly) for dinner.  This one is a favorite of ours.
  • Big Girl has been begging for some Shepherd’s Pie so I will probably make that one night, too.

SuperMan is working a big “shut down” at work and is going to be gone most of the week – 14 hour days – so I don’t know if I’ll do too many more big meals than that. Cereal and/or pasta nights might creep in as they’re easy and quick to fix and the girls are quite happy with that.

And now I’m off to brew some Tazo AWAKE tea, because I think I’m gonna need that extra jolt to get me going today.


Turkey & Rice Soup

I mentioned yesterday we had two turkeys this year for Thanksgiving. SuperMan felt if one was good, two was better. Smile Not really. We just couldn’t decide between smoked or fried, so we ended up doing both. I had gotten a free turkey, so it seemed like a good thing to do. Well, now I have a ton of turkey to deal with and so this will most definitely be on my list of things to make this week (maybe even today).

Turkey Rice Soup

It’s super quick, super easy and super good.

If you’ve got leftover turkey to deal with, you might want to give this a try. I’m betting you have most of the ingredients in your pantry already.

Turkey & Rice Soup

~1 pound cooked turkey (or chicken) diced into bite-sized pieces
1 can cream of chicken soup
2 – 2 1/2 cups (cooked) rice
~ 1/2 cup celery, diced
~ 3/4 cup carrots, diced (I just used a handful of shredded carrots)
2-3 cups chicken broth (I used one box of broth)
Houston House Seasoning to taste

  1. In a large stockpot, combine all ingredients except rice.  Bring to a boil and simmer for 20-30  minutes. (You could also do this in your crock pot on low for 2-3 hours)
  2. About 10 minutes before serving, drop the rice in and mix to combine.  Heat through.
  3. Serve.

Turkey Rice Soup

Saturday Sweetness from the Crock Pot

I know, I know, goodies in the crock pot?

I will admit I’ve never successfully cooked very many sweet things in the crock pot. To me, the crock pot is reserved for savory dishes, soups and stews.  But I just had to share this with you.

My neighbor’s mom makes this every year and we are always so thrilled when they bring a little bit over to share with us.  Nana makes the best treats and this one is a particular favorite of mine.  This week, she came to visit (we had “Nana Central” in our cul-de-sac, with two grandmas visiting, Little Bit said.)  and she made a batch.  Luckily we were the recipients of a sample.

crock pot candy

After trying it, my mom said, “We need to make some of this.” So we set out to find the recipe online. We found several blogs and websites with the recipe, even a Redbook article that dubbed it “Trisha Yearwood’s candy” although I do wonder if she really invented the candy herself. It seems to me to be one of those ubiquitous candies that appears every holiday – kind of like fruitcake and fudge. Which, truthfully, is just fine with me, because I LOVE it. (Here’s another link to a source recipe we used as our base.)

It’s sort of a cross between a Payday candy bar and peanut butter fudge.  Which is crazy because even though I swore it had to have peanut butter in it, I found out that it doesn’t!  Not one drop.

The secret ingredient is dry-roasted peanuts. That, and I think, the crock pot.  When you cook this, the layering in the crock pot is apparently critical. I think the roasted peanuts are on the bottom and as they heat up directly on top of the heating elements of the crock pot, they must infuse the chocolates (yes, plural) with the roasted peanut flavor.  What you end up with is so delicious. And, so stinkin’ easy, it’s almost embarrassing.

This will definitely be on my list of goodies to make for our friends this holiday season.  I hope you give it a try.

Crock Pot Chocolate Peanut Candy


2 jars (16 oz.) dry roasted salted peanuts
1 package (12 oz.) semi-sweet chocolate chips
4 oz sweetened Baker’s German chocolate (green packaging), broken into pieces
3 lb (two 24 oz. pkgs.) white almond bark, broken into pieces (some packages of almond bark may have “candy coating” as the name on the package)

Directions

  1. Put ingredients into a 4 or 5-quart crockpot in EXACT order as listed.
  2. Cover and cook on LOWEST setting for 3 hours. DO NOT remove lid!
  3. Turn off and allow to cool slightly.
  4. Mixture will not be melted but will be soft.
  5. Mix thoroughly and drop by teaspoon size cookie dropper or a teaspoon onto parchment paper.
  6. Let cool thoroughly. Makes approximately 100 pieces, depending, of course, on how large you make the pieces.

A few notes:

  • My large crock pot barely held all of this – you need a BIG crock pot.
  • I had to turn it from Low to Warm about 2 hours into cooking as I noticed the white chocolate was starting to turn brown on the sides.
  • I used a tiny ladle to drop this on the parchment paper. We made 100 candies about 3/4 of a ladle full and let it sit on the counter overnight to cool.

crock pot candy

White Bean Chicken Chili

Yesterday it was gloomy and rainy.  I knew it was going to be that way from the long-range forecast I saw over the weekend and so I planned something warm and filling for supper.

I made white bean chicken chili.  My little one doesn’t like soup (so she says) and this is one of the few that she will eat.  Our neighbor served it for the first time we ever ate it and we all fell in love with it.  PL 4x6 print pages - Page 054

I think of it as a cross between a soup and a chili.  It’s brothier than a chili normally is, but it has most of the same ingredients as a chili.  I’ve tweaked the recipe a bit and include canned tomatoes which were not in the original recipe I used. I like the extra flavor and think it stays more true to the “chili” that way.

I also made my own chicken broth earlier in the day – I didn’t have any cooked chicken so I took a few breasts, put them in some water with seasonings and cooked them. I strained the broth and used that as the base for the soup.

Last night I served it with grilled cheese sandwiches on Italian bread. It was hearty, filling, and perfect on a dark and stormy night.

I made mine in the crock pot (or you can do it on the stove – I’ve done it both ways) and the house smelled so good when we got home from Big Girl’s pre-op appointment – hungry and cold, but not for long.

Give it a try. It’s super easy and super good.

White Bean Chicken Chili  

2 cans white beans (I used cannellini beans)
1 can Rotel (diced tomatoes with chilies)
2-3 cups chicken broth
1 pound (approx) shredded cooked chicken breasts
1 can (7 oz) diced green chilies (or you can use 2 small 4-oz cans)
2 Tbsp minced garlic
1 Tbsp dried minced onion (or 1/2 fresh onion diced finely)
2 tsp ground cumin
2 tsp dried oregano
1 tsp dried cilantro

Add all ingredients to your crock pot.  Set on High for 3-4 hours, or Low for 4-6 hours. Everything is cooked, so you’re basically just melding the flavors.
If you are using a stock pot, just bring to a boil and then let simmer for 30-40 minutes before serving.

You can serve with tortilla chips, sour cream, salsa, etc. or just enjoy as-is (which is what I prefer)

PL 4x6 print pages - Page 055

Saturday Sweetness: Harvest Cake

saturday sweetnessI think I have mentioned before that my favorite cake is the Apple Cake that my mom and I make all the time. I absolutely love it.  Not too sweet but just perfect with a cup of tea, or coffee or all by itself.

I found this Autumn Cake recipe on Pinterest and decided to give it a try. I have to say, it’s right up there with the Apple Cake recipe now in terms of my favorites. I’ve made it twice and it was even better the second time, I think.

The biggest difference is that the second time I didn’t put the glaze on.  The original recipe called for a glaze, but to me, it masked the flavor of the cake and was too sweet.  The second time, I left the cake au naturel and didn’t add a glaze. It was perfect.

The first one I made for our friends from church. One of the guys mentioned as he was eating it that it tasted like “Autumn on a plate” and I have to agree.

Give it a try – I think you will agree as well!

harvest cake

Harvest Cake

2 cups all-purpose flour
2 tsp baking powder
1/2 tsp baking soda
2 heaping tsp ground cinnamon
1/4 tsp nutmeg
Pinch of salt
1 tsp ground ginger
1 1/4 sticks (10 tbsp) unsalted butter, at room temperature
1 cup sugar
1/2 cup (packed) light brown sugar
2 large eggs, at room temperature
1 tsp vanilla extract
1 1/4 cups canned unsweetened pumpkin puree
1 large apple, peeled, cored and finely chopped (I used Honey Crisp and Fuji)
1 cup dried cranberries
1 cup pecans, coarsely chopped

Directions:

  1. Preheat the oven to 350 degrees. Butter a 9- to 10- inch (12 cup) Bundt pan.
  2. Whisk together the flour, baking powder, baking soda, cinnamon, nutmeg, salt and ground ginger.
  3. In a large mixing bowl, beat the butter and both sugars together at medium speed until light and fluffy.
  4. Add the eggs one at a time, and beat for 1 minute after each addition.
  5. Beat in the vanilla.
  6. Reduce the mixer speed to low and add the pumpkin, chopped apple.
  7. Still on low speed, add the dry ingredients, mixing only until they are incorporated.
  8. Finally, gently stir in the cranberries and pecans.
  9. Scrape the batter into the pan and smooth the top with the rubber spatula.
  10. Bake for 60 to 70 minutes, or until a thin knife inserted into the center of the cake comes out clean.
  11. Transfer the cake to a rack and cool for 10 minutes before unmolding, then cool to room temperature on the rack.
  12. DEVOUR!

comments graphic2

Comfort Food at it’s Best: Chicken & Dumplings

Y’all, I am really here. I promise.

It’s been one of those weeks (again) – Big Girl is sick – 100+ fevers for three days now. I’ve been sick.  Work is crazy.  Life is nuts.

But we’re surviving, we’re hangin’ in there.  I’m just remembering my priorities and focusing on those and letting the rest slide.  Like cleaning my house. (which is really starting to drive me nuts. I hate dirty floors.)

Tonight I made something that is one of my family’s favorite comfort food dinners.  Chicken & Dumplings.  It started off as a copycat recipe I found for Cracker Barrel chicken & dumplings, but I’ve slowly made it my own and I thought I would share it with you all here.

It’s so good. It is not a quick recipe to make, though.  This one takes me a few hours to do – so plan your time accordingly.  It’s one that you can’t really rush.  You could, however, do it in stages and just finish the last part off on the day you plan to eat it.  Even then, though, you need about an hour for the dumplings to cook properly.  Un-done dumplings = not good.

Chicken&Dumplings - Page 051

I have chicken thighs/legs written in the recipe, but I will tell you that I’ve made this with whatever chicken I’ve had in my freezer.  Thighs, legs, breasts, miscellaneous parts.  It all works out. I think the thighs are the best because they seem to have a better flavor and don’t dry out like the breasts do.  Also, I use bone-in whenever I can. Then you get the goodness in your broth from the bones and deboning a few thighs is not really a big deal – they usually just fall apart anyway.

I also use whole wheat flour for my dumplings, but you can use whatever you would normally use. I have used white flour before, but I don’t stock that in my pantry anymore, so I make it with whole wheat. The family doesn’t know the difference.

And, one other thing – when you pour the milk into the dumplings, don’t just dump it all in there at once. As I’ve said before, doughs (like breads and dumplings) are humidity sensitive. You may need more or less depending on how humid it is in your house that day.  I pour a measuring cup and then just add a little at a time until it is the right consistency.

IMG_2245[1]

What is the right consistency?  Well, it’s a good, cohesive dough, that is a little bit tacky to the fingers but not super-sticky.  If you get too much milk in there, just add a little more flour until you get it right. It’s not rocket science. It’s easy.  And once you make your own dumplings you won’t ever want to buy store-bought ones again. They are so good.

Chicken&Dumplings - Page 050

So, while we are battling our bugs and surviving the myriad crises, we’ll comfort ourselves with a little bowl of this – and maybe again tomorrow for lunch. It’s even better warmed over.

Please do let me know if you try it – and how you like it. I always wonder if people actually try the recipes I share or if I’m just slowly building an online cookbook for my own reference…

Chicken & Dumplings


2 pounds of chicken thighs/legs (bone in, skin on is fine)
2-3 stalks of celery (with the leaves on the top)
~1/2 – 3/4 cup of carrots, chopped finely
3-4 chicken bouillon cubes
Houston House Seasoning
1 tsp minced garlic
water
salt/pepper

For the Dumplings:

1 – 1 1/2 cups milk
2 cups flour (all purpose)
1 heaping tbsp baking powder
1 tsp salt

  1. Fill a large stock pot with water.  Add the bouillon, about 1 tsp salt, 2 tsp pepper, and start to bring to a simmer.
  2. Chop your celery and carrots. Add to water.
  3. Generously season the chicken with the house seasoning (onion powder, garlic powder, salt & pepper)
  4. Add chicken to water.
  5. Bring to a boil and let simmer for 2-3 hours or until chicken is falling off of the bone.
  6. Remove chicken from broth and debone, discarding the fat, gristle and any skin. Cut into bite-sized pieces and add back to the broth.
  7. To make the dumplings, put the flour, baking powder and salt in a mixing bowl.  Gradually add milk until you have a slightly tacky (not sticky) dough.
  8. Let the dough rest for about 5 minutes. While the dough is resting, bring your broth to a rolling boil.
  9. Roll out the dumplings. I usually do two batches (half of the dough at one time) and generously flour my counter.  I roll them pretty thin and then use a pizza cutter to make dumplings about 1/2 inch wide by about 1 inch long.
  10. As the broth is boiling, drop the dumplings in.  Continue dropping them in, stirring as needed to get them submerged, until all of the dumplings are in the pot.
  11. Reduce to medium or medium-low heat and let simmer for about an hour. I leave the lid on the pot, but at an angle so that it does not boil over.

Serve with biscuits, saltine crackers or just in a bowl and devour!

Note: If you make this in stages, you could do your chicken, save the broth and deboned chicken and then re-assemble & bring to a boil while you make your dumplings at a later date.

I also have a crock-pot chicken & dumplings recipe you could try if you are not going to be home during the day and want some goodness when you get home.

Chicken&Dumplings - Page 050