Adventures in Artisan Bread Baking (part 2)

I mentioned a while ago that I had received Flour Water Salt Yeast by Ken Forkish as a Christmas gift and that it had started me on a quest to make great artisan bread at home.  You can read my adventures with the first few recipes I tried in that book here.

Not long after I tried my hand at baking the breads in that cookbook, I found out that Artisan Bread in Five Minutes a Day was on sale in the eBook version.  So, I hopped on over to Amazon and got the Kindle version. I couldn’t wait to try out another style of baking artisan breads and the “five minutes a day” hook was certainly intriguing to me.  Especially after taking two days to make a loaf of bread using Forkish’s methods.  Don’t get me wrong, those breads were totally awesome, just time consuming. But as he says, good bread takes time. So, how would a five minute bread compare?

I was ready to find out.

The secret, as they call it in the book, is to make enough dough to last several days (or for several loaves) and keep it in the refrigerator.  You mix once, and bake many.

I can do that, I thought.  Let’s give it a shot.

As with Forkish’s method, their dough is a wet dough. Much wetter than the other bread doughs I’ve been accustomed to making. But since I’d just made the other breads, it didn’t seem strange to do it this way.  I found a 2 1/2 gallon bucket that I’d had stashed and mixed up my dough in that.  Just as with the Flour Water Salt Yeast bread those were the only four ingredients.   What was different was that there was no long proofing time and no long rise time.  Strange, I thought.

I made my first batch one afternoon and let it sit in the refrigerator overnight although the book said you could mix the dough in the morning and bake your bread that evening if you chose.  I didn’t mix my dough until late in the day so I let it rest overnight.

The next afternoon, I baked the bread.  Another difference was the baking method.  With Forkish’s method, you bake in a covered Dutch oven to get the steam going and crust development.  With the 5 Minute method, you bake on a baking/pizza stone and use a separate container of water in the oven to accomplish the steaming and crust development.  I was curious to see what differences there would be, if any.

So, I baked, and peeked through the oven door watching it baking and wondering how the final bread would turn out.

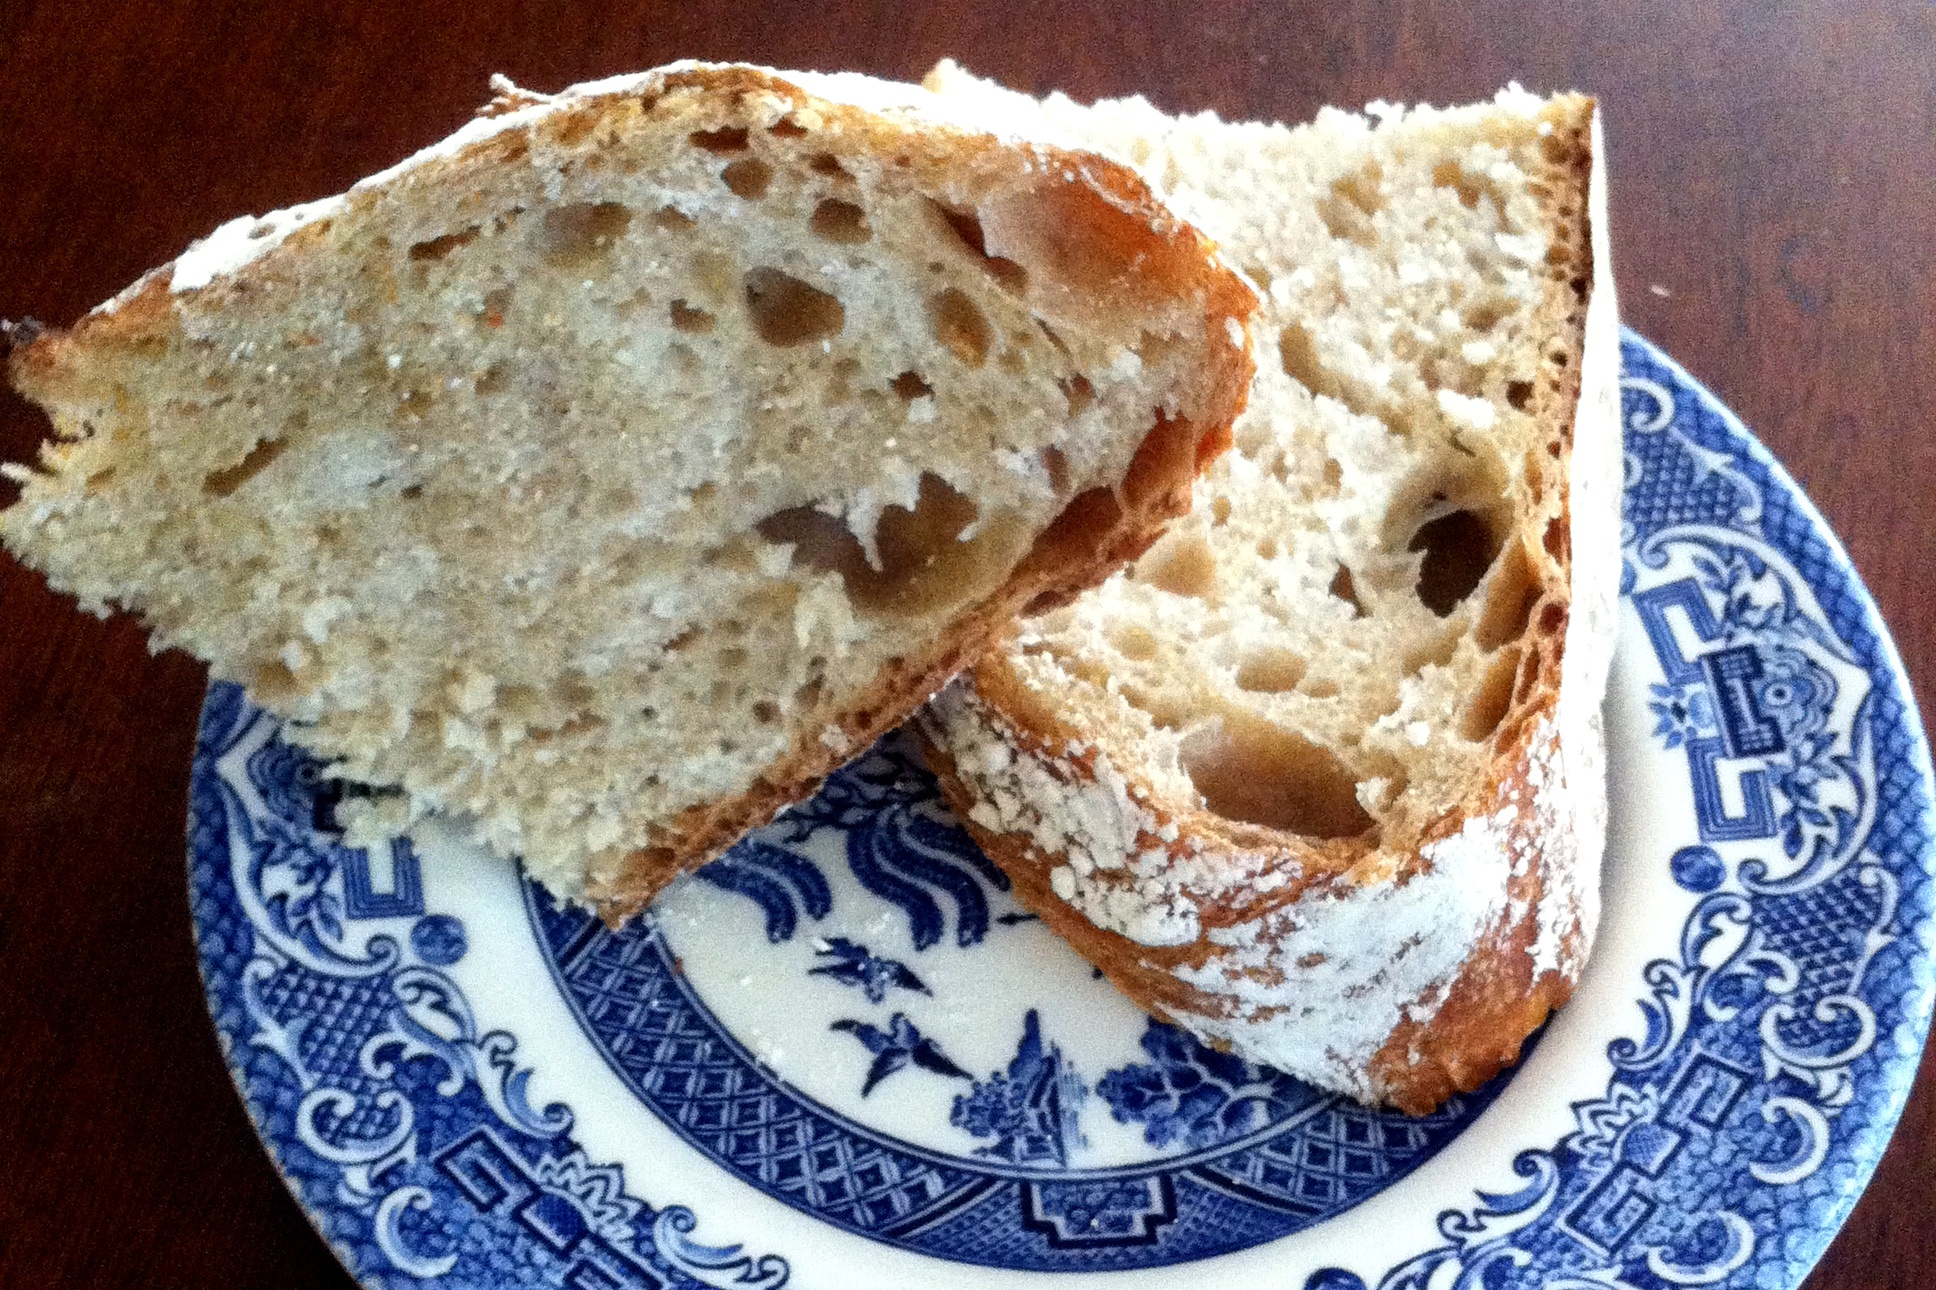
I tried the Light Whole Wheat Bread recipe.  The recipe states it will make four 1-pound loaves. In my first batch, I only got two loaves out of the mix.  However, I think my loaves were closer to 2 pounds each. I decided that rather than doing a free-form loaf baked on the pizza stone, I wanted to try using my Pampered Chef stoneware loaf pan. I figured the stoneware would work the same and I’d get a pretty loaf-shaped loaf of bread.

I was not disappointed.  It turned out well. So well, in fact, that we gobbled it up almost immediately. Fresh, warm bread out of the oven, slathered with a little butter. What could be better?

As I continued to read the book, I saw that they say the later loaves from the dough (that have sat for a few days) bake up with a sourdough taste to them – from the ongoing fermentation of the bread that happens as it sits in your refrigerator.  The second day’s batch was even tastier than the first and it did indeed have more of a sourdough flavor to it.  Not the same complexity of flavors as the breads I made from Flour Water Salt Yeast, but still good.  Perfectly good for sandwiches and everyday eating. Especially since I mixed the dough once and got two separate batches of bread out of it.  I loved the quick prep times and the easy payoff of bread dough waiting in the fridge to be popped in the oven.

My only complaint? That the bread didn’t rise very much. It didn’t have the big bubbles and high rise of the other artisan breads.  Now that could be (and most likely is) my fault.  I may not have had the water hot enough. (or too hot) I may not have measured my yeast accurately enough. It was rainy so the dough may have been too wet. There is no telling. Bread is a delicate balance of all of these things – so it’s always a guess as to what goes right or wrong when you bake.  The only secret is to keep baking, take notes, and replicate what works well.

And so that’s what I’ll do.

I’ll keep baking.

I’m planning to continue to try recipes from both cookbooks. I figure eventually I will come up with a recipe and method that works for my family and schedule.  And then bread nirvana will be obtained. Smile

Until then, I’ll have lots of fun tasting the samples.

Get your own copies of the books:

Adventures in Baking Artisan Bread (part 1)

Flour Water Salt Yeast by Ken Forkish

For Christmas, SuperMan got me a cookbook I had been dying to get.
(he is awesome that way)

It’s Flour Water Salt Yeast by Ken Forkish – I’d heard him speak on Martha Stewart radio one day while I was waiting in the carpool line. I was impressed with his story – leaving the tech industry to pursue his passion – and with the fact that he says even the home cook can make excellent home-cooked, artisan breads. I went home and added his book to my wish list.

Thankfully, SuperMan read the wish list 🙂

The Adventure Begins

His book is both a cookbook and a teaching instrument. The first few chapters are dedicated to his story, the principles of artisan breads, familiarizing the reader with different types of breads (levain, poolish, etc.) and then the recipes. I took the book with me to Mom’s house with plans to read it cover to cover before beginning any baking.

My brother, on the other hand, took one look at the book and decided we were baking a loaf THAT NIGHT. He’s adventurous in the kitchen like I am and so we decided to go for it. Or rather, I decided to let HIM go for it and watch the results.

He decided on a basic overnight bread recipe and we ended up staying up until well after midnight (which was fine for his pacific time zone body, but not so nice to mine) waiting for the final steps to complete before we put the dough to “bed” for the final long, slow rise in the refrigerator overnight.

We had quite the adventure making the bread at Mom’s without all of the suggested tools but we made do. One thing you absolutely need to make bread via the “Forkish method” is a cast-iron dutch oven. The proofing baskets, dough tubs, scales, etc. that he suggests I’ve managed to do without (or work around) and we did just fine that first time without them, too.

But, the dutch oven is required because it’s what you use to capture the steam from the bread baking and create a fantastic, crispy crust and light, springy bread. The bread we ate the next afternoon was some of the tastiest home-baked bread I’d ever eaten. We devoured it, all two loaves of it, in a matter of a few minutes. The kids loved it. The adults loved it. And we began to contemplate our next foray into artisan bread baking.

Continuing to experiment: success and disappointment

After our initial attempts, I stepped back and read the book. Not cover to cover, but the first four or five chapters where he goes over technique and tools and the basic recipes. I have to say, this is the best book I’ve ever read for explaining the process of making bread. He explains the whys, wheres, and hows… in great, but very interesting, detail. He provides beautiful pictures – with step-by-steps just where you need it and pictures of “this is what this is supposed to look like.” Which is great when you’ve never, ever made bread this way before.

I kept referring back to those pictures over the next two weeks as I made a few more batches of bread. The first I made at home I used my own, home-ground wheat. It was good, but heavy. The next batches I made using store-bought flours. It was much lighter and tastier. The kids and SuperMan loved it. (Ken doesn’t say anything about using home-ground wheat flour. I just decided to experiment with it to see how it would come out)

I want to emphasize that the most important ingredient for making good bread is plenty of time…
Chapter 2: Eight Details for Great Bread and Pizza

Me? I wasn’t quite as in love with it as they were. It didn’t have anything to do with the flavor, though. The flavor was spectacular. Like something you’d get from a fancy bakery. It was the time involved. It took me about 2-3 days to bake a loaf or two of bread. That’s a LONG time. Granted, Forkish does not make any promises of quick bread production. As a matter of fact, he cautions that good bread takes time. A lot of time. And he wasn’t kidding.

Working from home, I originally thought it wouldn’t matter that the process took time, and for the most part, it didn’t. Up until I wanted to plan for fresh-baked bread for a dinner party I was hosting. My head hurt reading his suggested time-tables and trying to back into when I would need to start the process (the day before) in order to have hot bread at 5PM on Sunday night. I gave up. I went to Publix and bought some of their whole grain bread. Everyone was happy. No one knew any different.

Artisan Bread (take 1)

But I was dissappointed. I love, LOVE to bake for people. What’s the point of not being able to share this goodness with folks? I mean, I’m sure I can. I just need to figure out the timelines (or be happy serving not-fresh-out-of-the-oven bread) I am not, by any means, giving up on the book or the recipes. The bread is simply too good to do that. I just need to figure out a timeline that works for me and my schedule.

The good news is most of the time that is required is not active time, but fermenting, rising, and proofing time. You just have to be around when it’s time to move to the next stage.

The bread I made was a pre-fermented dough (poolish) which fermented for 12-14 hours before being mixed into the final dough. From there, the dough had a rise of about 2-3 hours and then a final proof about an hour. So, if you start the poolish at dinner the night before, you can expect to have bread around lunchtime the next day. What I haven’t tried (or figured out) yet is whether or not I can extend that ferment or rise time (or a rest between) so that I can have the dough ready at dinnertime instead. I plan to do just that, but need to wait until I’m not baking for company to experiment.

The poolish bread was excellent. Really, really, really good. And it kept a lot longer on the counter than a traditionally baked loaf of bread. I think it has to do with the fermentation process giving you some extra preservative factor, but the true science of it escapes me. I got close to a week on the counter before the bread started to mold. I think it would’ve gone even longer if it hadn’t been 100% humidity (with 4 days straight of monsoon-type rain) and stored in ziplock bags. That’s a sure recipe for mold if you ask me.

And my plans for the future

Artisan Bread (take 2)

Next, I want to try the Levain breads. Levain is the French word for “sourdough.” I’m thrilled to have an “official” guide to creating these as I’ve been wanting to make sourdough breads for about a year now and have been intimidated by the whole process. With this book, I feel much more equipped and those little ferments don’t frighten me quite as much. No more nightmares of sourdough starters taking over the refrigerator while I sleep. 🙂

Overall, I have to say, I am really glad I got the book. I am looking forward to baking my way through the recipes this year, which include pizza and foccacia recipes as well.

I’ve been continuing to experiment in baking artisan breads and in my next installment I’ll share the other cookbook that’s got me baking and serving artisan breads every.single.night. And loving it.

Stay tuned.


comments-graphic2.jpg

From my kitchen


Today is my crazy busy day – for work and for the girls.  Both of them have dance class and I have an afternoon of back-to-back conference calls. It makes for one tired mommy in the evening, that’s for sure.

To combat that, I try to do a little prep work ahead of time in the morning – preparing something yummy & healthy for dinner and planning out whatever else I need to for the rest of the day. It just saves my sanity and helps me to enjoy being with my kids more rather than stressing out and being cranky.

Today, I changed up my planned dinner. Usually, Thursdays are leftover nights (because it is easier to warm things up than cook from scratch when you’re running back and forth between school & the dance studio. can I get an amen?)

But today, I was thinking about the jumbo pack of mini-sub rolls I got at the warehouse store the other day… the same mini-sub rolls I just knew the girls would love for cute little sandwiches for lunch.  And the very same mini-sub rolls they most definitely do not like for their lunches – as evidenced by the returned, uneaten sandwiches two days this week. Sigh.

So, I was trying to figure out how I was going to use those rolls before they became a science experiment on my counter.  I don’t eat (much) bread and SuperMan is trying to cut back… which leaves quite the dilemma. Until you start to think about things like… garlic bread!

So, once my mind went to garlic bread, I decided to try out this new recipe I’d found on Pinterest – it’s for a crock pot ravioli casserole.  Perfect! And because I’m-a good-a little-a Italian girl, I have all the ingredients on  hand. (wink, wink)img_1962

With dinner planned out, I decided to tackle another looming kitchen problem. Bread.  I have gotten back on the wagon of making my own bread; partly to help Big Girl’s tummy issues and partly because it’s just so darn good.  But the problem is that Little Bit doesn’t like it and SuperMan isn’t wild about it (he’ll eat it, but I think he only does it because he doesn’t want to hurt my feelings).  They say it is too dense. Which, ironically, is what Big Girl and I love about it.

ANYWAY – I rummaged around and found an old bread recipe and decided to whip up another batch to see if I could make a lighter loaf.

img_1963

I made one as a cinnamon raisin bread and the other plain.  They’re cooling on the counter now, so we will see what the troops think when they return home tonight.img_1968

They sure SMELL GOOD – between the garlic and the bread, my house smells SO GOOD right now.

And speaking of garlic – here’s another fallen soldier:img_1967

I am going to have to start counting how many of these I go through in a year. I think I open a new one about every 2 months.

No vampire problems here, that’s for sure.

So, what’s going on in your kitchen this week?


I’m Baking today

I’m baking today.

Just some simple things for the family – Little Bit’s favorite oatmeal cookies, some fresh bread, and maybe trying my hand at some granola.

Getting my lists together – food to fix for the party on Saturday night, things I want to take to Mom’s next week, final gifts to pick up on my day off, tasks to complete before the holiday break begins… I couldn’t survive without my lists.

That’s what my day is going to be like.

How about yours?

Grinding your own grains

Oats, barley, and some food products made from...
Image via Wikipedia

I just read a great article over on goodLife{eats} and thought I would share it with you… It’s about grinding your own grains – something you know I am in favor of.

I swear that our family has been healthier (and eating healthier) since we started grinding our own grains this spring. I made the decision to begin to grind our own wheat once I learned about how much healthier this was. When commercial flours are created, the germ is removed, removing many of the vitamins and nutrients that are so good for us.

Additionally, I love the flavor of freshly-ground flours. Once you try something made with freshly-ground flour, you will not want to go back to “store-bought” flours.  The fresh flour has a lightness, a sweetness and nuttiness, that the other flours lack.  Whenever I eat something that has been made with store-bought flours, I can always tell. It tastes flat to me. Dead, even.  Fresh flour is bright, green, and flavorful.

She’s even got a review of one of the grain mills you can purchase (NutriMill) – I have a different one, but from what I’ve learned there are only minor differences between the two brands.

If you are interested in learning more about grinding your own meal, baking your own bread and getting started with whole grains for your family, you might want to watch some of the videos on the BreadBecker’s website:

If you’ve been thinking about doing this for your family, check out the articles. They are a great source of information!

(we) just have to try this…

If you’re like me, you’re always looking for something new to try – and yet I always seem to stick to the same tried-and-true recipes. I think it is because it is easier on a busy week night to stick with what you know (and know your family will eat!) than to break out the new recipes.

It is more about getting people fed than it is about being creative and trying new things. (or at least it is for me)

But, there are days when I just want something new and fresh and different.

And Saturdays are usually my “experimental” cooking days – Saturdays or Mondays. Saturdays are good because I have all the time in the world and can experiment to my heart’s content. Mondays are good because I’m (relatively) rested from the weekend and (more importantly) everyone is out of the house and I have peace and quiet to craft, create and experiment with new recipes.

But I’m always on the hunt for things other people have tried and loved and today I thought I’d share with you another list of the recipes I’ve flagged lately as “must try this.”

Okay, that’s all for now – any recipes you are dying to try? Share them with the rest of us in the comments!

Baking day

I haven’t been in the mood to cook all week. We’ve been eating on leftovers and sandwiches for dinner most nights. My best intentions from Monday’s menu planning have been for naught.  Today, however, I feel a little different – thinking about what to cook for dinner and I’ve tossed out the “plan” from Monday and moving on to cooking something that inspires me.

So, today I am baking.

First up was the baked oatmeal I love and that I make WLS-friendly so I can have it for breakfast. That’s cooling on the counter now. (minus a square I’ve already nibbled for my breakfast)

Next up is my beef with egg noodles & gravy. That will be supper. I’ll be getting it into the crock pot soon.

I’m also going to bake some bread.Bread photo from Delicious! Delicious!

Trying to decide between my recipe for Portuguese Sweet Bread or a new recipe I found for Oatmeal Bread. The Portuguese Sweet Bread never survives for more than a few minutes after it comes out of the oven. The kids and SuperMan LOVE it.  The Oatmeal bread sounds yummy (and healthy) so I’m not sure which one I will make.

Do you make homemade bread?  I love doing it and it’s one of my favorite fall traditions.  It’s so easy if you have a bread machine – and so much better for you than the store-bought breads with all their preservatives and additives.

And, it makes the house smell so good. Add that smell to the crock-pot smells, and who WOULDN’T want to come home for supper?

I’m off to channel my inner Betty Crocker…

Enhanced by Zemanta

What’s for Dinner?

Here’s one of my favorite go-to recipes for the nights that SuperMan is working late and it’s just me and the girls for dinner.

Sesame Chicken BitesSesame Chicken Bites

Yum.

My girls love them just like they are straight out of the oven. No sauces, ketchup or anything needed.

I make them with two gallon sized zip top bags.

I use one for the mayo base coat mixture.  The second is used to hold the breading coating.  Easy cleanup and easy prep. Love that.

I use flash-frozen chicken tenders and cut them into bite-sized pieces.  This makes the dinner such a snap to make!

Here’s the recipe.  I think it would also be great to serve at a cocktail party with a little honey mixed with horseradish for a dipping sauce.

Sesame Chicken Bites

1 cup bread crumbs
1/4 cup (apprx) sesame seeds
1/2 cup mayonnaise
1 tsp dry mustard
2 tsp Houston House Seasoning
3 boneless, skinless chicken breast halves (Cut in bite-sized pieces)
(you can also use chicken tenders cut into pieces)

  1. Preheat oven to 425 degrees.
  2. In a large gallon zip top bag, mix the bread crumbs and sesame seeds. Add a dash of Houston House Seasoning
  3. In a small bowl, mix mayonnaise, mustard & house seasoning.  Pour into a second gallon zip bag.
  4. Drop chicken pieces into the mayo bag and toss to coat.  I usually let the pieces sit in the bag in the refrigerator for 5-10 minutes.
  5. Drop the mayo-coated chicken into the bread crumb/sesame seed mixture and toss to coat.
  6. Place chicken nuggets on sheet pan that has been sprayed with oil.
  7. Bake at 425 for approximately 15-20 minutes (or until chicken is done and coating is lightly browned)

I serve them with homemade french fries, a little fruit and sometimes some yogurt. Quick and easy – and healthy!

You can print the recipe here.

Enhanced by Zemanta

What do monkeys eat for breakfast?

Have you ever wondered what monkeys eat for breakfast?

I don’t mean the monkeys you’ll find at the zoo.

I mean the monkeys you’ll find if you visit my house!

Curious?

Well, most, days, the monkeys have exciting things like Carnation Instant Breakfast served with side of toast or pop tarts.

But on Fridays, we mix things up a bit. SuperMan is off on Fridays, so I have a little more time in the mornings. Less rush-rush-rush and more nurture-the-family time.

So, I make things like this

imgp3113

Yep, you guessed it!

Monkey Bread!

The kids were not sure they were going to like it – Little Bit was afraid there were monkeys in the bread. Big Girl said it didn’t sound good.

But they LOVED it.

And SuperMan (after telling me I was ruining his diet) ate some, too.

Even Mr. Droopy-Pants had a taste.

imgp3114

And I sent them all away for the day, full of sugar and carbs and bouncing off the walls.

I’m sure their teachers appreciated it.

I’m such a good mom.

If you’d like to indulge in a little sugary goodness one morning, here’s the recipe.  I am most definitely not a morning person and this wasn’t painful to make, even though it was five-stinkin’-thirty in the morning.  I’ll do it again for sure. It was worth the effort.

Monkey Bread

It’s what monkeys eat for breakfast!

2 packages Pillsbury Grands Biscuits
1 cup sugar (I used 1/4 c Splenda 1/2 c sugar)
2 tbs ground cinnamon (I just dump a bunch in)
1/2 cup (1 stick) butter
1 cup, packed, brown sugar (I used 1/2 c Splenda/brown sugar blend)
1 tsp vanilla

OPTIONAL:
1/2 c chopped walnuts
1/2 c raisins
(the monkeys at my house don’t like raisins or walnuts)

  1. Preheat oven to 350 degrees.
  2. Grease 9 or 10 inch tube/Bundt pan.
    Note: if you use a tube pan with a removable bottom, put a cookie sheet on the oven rack below it to catch any drips of the caramel sauce that may seep through and be careful when you dump the bread from the pan.
  3. In a gallon zip lock bag, mix the sugar & cinnamon.
  4. Cut the biscuits into quarters and drop them into the cinnamon/sugar mixture.
    (I cut mine into sixths because the Grands are such big biscuits)
  5. Shake to coat and then drop the coated biscuit pieces into the tube pan.
  6. Continue until all biscuits are coated and placed in the pan.
    If you are using nuts/raisins, don’t forget to sprinkle them in as you are adding the biscuits to the pan.
  7. In a small saucepan, melt the butter and brown sugar together.
  8. Add the vanilla.
  9. Let it simmer for about a minute.
  10. Pour over the biscuits.
  11. Bake at 350 for 35 – 40 minutes.
  12. When you take the bread out of the pan, let is sit for a few minutes to allow the caramel to set.
  13. Turn out onto a large plate and let your hungry monkeys pull it apart (carefully) and enjoy!

Print the recipe here