Stepping Out of My Zone

If you’ve read this blog for any length of time, you know that I’m not afraid to try new things – new recipes in particular.  I’m also not afraid to mix it up and modify the recipe even if it is the first time I’ve ever made it.

I’m crazy that way.

Usually the results are tasty and we enjoy the experiments.

This week, I stepped way out of my comfort zone.

Tried something this good little Catholic girl never thought she’d make.

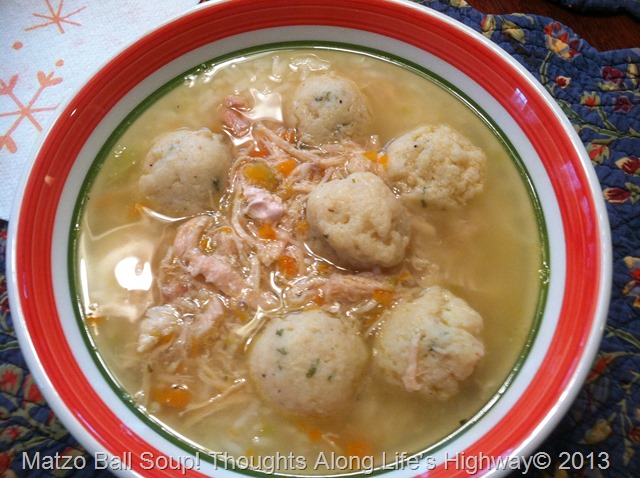
I made Matzo Ball Soup.

You see, I have this friend from work who has been telling me (whenever my kids get sick) that I need to make the girls some matzo ball soup.  He says it is great for what ails ya.  I would reply that I should do that, but I never did.

You see, I wasn’t sure I could.

Crazy.
Why would matzo ball soup scare me?

So, I grabbed the bull by the horns on Monday and whipped up a pot of soup.  I had planned to make some chicken noodle soup anyway so it wasn’t a stretch to make the matzo balls.

I have to say, I’m really glad I did.

They were SOOOOOOOO (is that enough o’s?!?) good.  Good enough that Big Girl went back (after the kitchen was cleaned and food put away) and ate a second bowl! We thoroughly enjoyed them.

I will most definitely make these again.

IMG_2946

(Thanks, Todd!)

Matzo Ball Soup

Make your chicken soup:

2-3 chicken breasts (bone in make a tastier broth, boneless are fine)
Dutch oven-sized pot filled about 3/4 full of water
2-3 chicken bullion cubes
1-2 stalks celery, sliced thin
2-3 carrot sticks, sliced thin (or diced)
~1 Tbsp minced onion
~1 Tbsp minced garlic
salt/pepper to taste

  1. Add all ingredients to pot.
  2. Bring to a boil – let sit on a low boil for 30-45 min or until chicken is falling off the bone (thoroughly cooked)
  3. Take the chicken out and shred/de-bone.  Add chicken back to pot.

Make your matzo balls:

I used Matzo Ball Mix and made according to the package directions.

1 Box Matzo Ball Mix
2 eggs
2 Tbsp vegetable oil

  1. Measure and mix the dry ingredients in a bowl.
  2. In a separate bowl, break the eggs.
  3. Add the oil into the eggs and stir gently with a fork until the yolks are broken and the oil is mixed. Todd says, “Do not  over mix!”
  4. Mix the egg mixture into the dry ingredients and gently mix with the fork. Again, do not over mix, or else they will be tough.
  5. Place it into the fridge for at least an hour.

Optional ingredients to the matzo balls are:
1/2 tsp garlic powder, or minced garlic.
1 tsp onion powder or freshly minced onion, if available.
1/2 tsp pepper
1 tablespoon dried parsley
2 tsp baking powder for soft matzo balls
4 tablespoons water or broth for firmer matzo balls.
(Todd says, “I tend to like it medium, so I add a tablespoon of broth and 1 tsp baking powder” I didn’t do either because I used mazto ball MIX that had this already in it.).

Put it all together:

  1. After the matzo ball mix has set, take a teaspoon amount and roll it into 1-2” balls with your hands.
    Todd’s tips: “I find it best to make sure my hands are a little wet, or else the matzo ball mix will stick to my hands. Remember the matzo balls will expand a lot when they are cooked in the soup.”
  2. Gently drop the matzo balls into the boiling broth and leave it to boil until all the balls float to the top.
  3. When they float to the top, you can then lower the temperature to a rolling simmer for about 40 minutes. You shouldn’t have to stir the soup.

Serve and enjoy!

Here is a great blog post with step-by-step pictures for making the matzo balls.

Project life Tuesday

I managed to get a little scrapbooking done over the weekend and I thought I’d share some of the pages I made with you –

The Mom Creative

This year, I’m doing my Project Life album digitally. I’m using Creative Memories’ Storybook Creator software and Becky Higgins’ Turquoise Edition (for the most part)  I’ve also purchased these nifty little overlays that allow my pages to look like true pocket pages (I’m loving them).

I’m planning to print my pages as a book – hopefully, it will all fit in one volume and take up less space on the shelf than the 2009, 2010, 2011 & 2012 versions which are 2 volumes (2 3” binders) each!

Here’s what I have done so far – I’m terribly behind. I keep hoping to do 2-3 weeks worth of pages per week, but that has not happened yet. BUT, the beauty of Project Life is that I’m not stressing about it. I knocked out these pages in less time than it took to watch a movie on Saturday night (Thor, in case you were wondering – love that Chris Hemsworth!)

2013 Family Album - Page 0022013 Family Album - Page 0032013 Family Album - Page 0042013 Family Album - Page 0052013 Family Album - Page 0062013 Family Album - Page 007

More, hopefully, to share next week!

Heaven in a cookie

A friend of mine made these cookies a few weeks ago.
It was love at first bite for me.

Seriously.

I wasn’t sure I was going to be able to restrain myself. They were SO good.

So, of course, I got the recipe.

IMG_2440

And tried to figure out when I’d have a good excuse to make a batch (or two).

That opportunity arose last weekend.  We were having a weekend picnic with our friends and then hiking afterwards.

Hmm… hiking = burning calories. I must find a way to replace said calories.

I know!

COOKIES!

And thus the baking began.

These are sort of a cross between a cookie and a brownie.  They have a little “bite” to the outside of them, but the inside is moist and soft (and chocolately) like a brownie.

They’re seriously good.

Dangerously so.

The original recipe is a Williams Sonoma recipe.  I changed mine up just a bit, so the recipe below is how I made them.

My friend tried one of mine on Sunday – she loved the modifications I’d made. I’d call that success!

IMG_2439

Chocolate Crinkle Cookies

Ingredients:

1/2 cup powdered sugar (or more if needed)
1 2/3 cup all-purpose flour (I used King Arthur white whole wheat)
1/2 cup Hershey’s Special Dark Cocoa Powder
1 1/2 tsp baking powder
1/4 tsp salt
1 stick (8 Tbsp) butter, at room temperature
1 1/4 cup sugar
2 eggs
1 tsp vanilla extract
1/2 tsp peppermint extract (optional)

Instructions:
  1. Preheat oven to 350 degrees F.
  2. Place the powdered sugar in a small bowl and set aside.
  3. If you don’t have a nonstick mat for your cookie sheets, grease them (2) with butter.
  4. In a large mixing bowl, combine the butter and sugar until creamy.
  5. Add one egg and beat until blended.
  6. Add the other egg and extracts and combine.
  7. In a separate bowl, combine the flour, cocoa, salt & baking powder.
  8. Slowly add these ingredients to the egg/butter/sugar mixture, keeping your mixer speed on low.  The dough will get thick quickly. Beat until just blended.
  9. Using a tablespoon (or cookie scoop) scoop up a rounded spoonful of dough. Form into a ball.
  10. Roll the cookie balls in the powdered sugar to coat.
  11. Place on the cookie sheets, about an inch or two apart. (I got four across on my cookie sheets)
  12. Bake 10-12 minutes. You’ll know they’re done when they are cracked and puffy.
  13. Remove from the oven and set aside to cool for about 2-3 minutes.
  14. Remove from baking sheet and allow to cool completely on wire racks.
  15. Store in an airtight container. (makes about 24 cookies)

Die of happiness.

You can thank me later. Smile

Book Review: Wild

I’m a little behind in sharing my latest reads with you – this one I actually read during the Christmas holidays. But, I wanted to share it with you because I really enjoyed it and thought it worth passing along as a recommendation.

What were you doing at twenty-two?

I know what I was NOT doing at that age – and that was contemplating taking off anywhere on my own for any length of time. Much less changing my name, leaving behind all that was familiar to me, and striking off on a hike ALONE along the Pacific Coast Trail.

But that is exactly what Cheryl Strayed did.

And then, eventually, chronicled the entire experience into this story – Wild: From Lost to Found on the Pacific Coast Trail.

The book is really, at its essence, a story about overcoming tragic circumstances and finding at the core of oneself strength and peace.

At times the book was difficult to read – “watching” the self-destructive behavior of a person who was lost and searching – reading about the pain and heartbreak of her mother’s death and the disintegration of her marriage and family afterwards – the mother in me wanted to comfort the girl-child in the book and tell her it would all be okay.  Strayed’s brutal honesty with her emotions, her actions, and her motivations both enthralled me and broke my heart.

And yet, there were parts that were charming and I cheered her on as she found her inner strength, learned to survive along the trail and even found peace and solace from her solitary journey.  In some ways, I envied that journey of discovery – when you’re left with nothing but yourself to rely on and your own mind to spur you on.

I can’t say that I ever considered hiking a trail (not even the Appalachian, which is close to home) with anyone, much less all alone.  And most definitely not at twenty-two years old. The extremity of what Strayed did was in proportion to the misery that she was in – finding herself all alone with ties to her life severed – partly out of her control and partly of her own choosing.  That she was able to complete the journey, physically and metaphorically, speaks to her strength and tenacity.  That she’s taken the story and turned it into a best seller speaks to her savvy.

Bottom line –

Would I recommend it? Most definitely.  Not my normal genre to read, but I thoroughly enjoyed it.

Easter Bunnies of the large and unusual kind

Our local farmer has a yearly tradition in which he puts out round bales of hay in the fall and paints them to look like Jack-o-Lanterns for Halloween.  They magically morph into snowmen for the wintertime and this year he has gone even further by creating Easter Bunnies!

IMGP4568

I absolutely LOVE this tradition and can’t wait for the hay bales to appear each fall and watch the transformation through the seasons. How cool that they are now sticking around into the spring!

IMGP4560

The cows were in the pasture today – very curious about the big guy taking pictures of them (SuperMan took these for me)

IMGP4563

I love the cows – still fluffy from their winter coats and oh, so curious.

IMGP4564

And the mamas so careful to step between the weird man and the babies.

IMGP4565

Mamas and babies – yes, spring is coming, folks…IMGP4569

I’m wondering what he could make those hay bales into for the summer…


Garlicky Shrimp with White Beans

I got the latest issue of Good Housekeeping magazine on my Nook the other day because I saw Dr. Oz on the front cover and I wanted to see what he had to say inside.

image

While I was nursing a sore back on my heating pad Sunday afternoon, I ran across this recipe in the magazine.  We happened to have all of the ingredients on hand so I decided to make it for dinner.

IMG_2434

I was a little unsure while it was cooking – unsure as to whether or not I’d like it since I’m not always a huge fan of seafood.  However, once it was all put together, I was pleasantly surprised. It was a tasty (and filling) dinner for SuperMan and me.  (the girls wimped out on trying it and ate leftover pizzas – win some, lose some, I guess)

Would I make it again? Absolutely.

What would I do differently? More garlic, more salt (a little) and some type of green (julienned spinach?) tossed in there, I think. And probably use spaghetti as the recipe called for. I used twists on Sunday.

Should you try it? Most definitely, if you like shrimp!

Garlicky Shrimp with White Beans

(adapted from Good Housekeeping Magazine)

12 ounces spaghetti (I used whatever pasta I had on hand)
1 pound shelled and deveined large shrimp (I used frozen medium sized shrimp)
3/4 teaspoon(s) smoked paprika
1 tablespoon(s) extra-virgin olive oil
1 can (15-ounce) no-salt-added white kidney (cannellini) beans, drained
3 Tbsp minced garlic
1 can (15-ounce) petite diced tomatoes
~1/4 tsp crushed red pepper (more if you like it spicy)
1/2 Tbsp dried parsley
Garlic salt to sprinkle on top as you serve (if you like more garlic flavor)

  1. Heat large covered pot of salted water to rolling boil. Cook pasta as label directs. Reserve 3/4 cup pasta cooking water.
  2. Meanwhile, in medium bowl, stir together shrimp and 1/2 teaspoon smoked paprika; set aside.
  3. While pasta cooks, in a large skillet, heat oil on medium-high.
  4. Add beans and garlic. Cook 2 minutes or until garlic is golden, stirring occasionally.
  5. Add tomatoes, red pepper, remaining 1/4 teaspoon smoked paprika, and 1/4 teaspoon salt.
  6. Cook 2 minutes or until tomatoes begin to release their juices.
  7. Add shrimp and cook 4 to 6 minutes or until cooked through, stirring occasionally.
  8. Drain pasta and return to pot.
  9. Add shrimp mixture, parsley, and reserved pasta cooking water; toss until combined.

IMG_2435
Original Recipe: Garlicky Shrimp and White Beans Recipe – Good Housekeeping

On the needles

I’ve knocked out a few washcloths and now, after a little struggle with a pattern, I’m off and running with the afghan I wanted to make – (this is the pattern on my Pinterest board)

IMG_2441

I’m making it with a chunky yarn – it’s so soft and cuddly. I can’t wait to finish! Maybe I’ll be done in time for next winter! (ha!)

I’ll keep you posted on my progress.

What’re you working on?


Saturday Night is Pizza Night

When I grew up, lunch on Saturdays was always hot dogs (sometimes sandwiches) and dinner was often pizza.  Which was perfectly fine with me because I absolutely love pizza. Sometimes, Mama would make homemade pizzas, using leftover spaghetti sauce and we’d get to top our own pizzas. Those were always my favorite because they were meaty and heavy with my favorite toppings.

We’ve been making homemade pizzas for a while now. I had shared a grilled pizza dough recipe a while ago, which is one of the standard recipes we used all of the time on the grill and in the house.  However, because I’m not one to leave things alone, I’ve continued to fiddle with the recipe and research more recipes and I’ve come up with a pretty darn good recipe that we’ve been using for the past few months.

This recipe makes two fourteen-inch (sort of) pizzas, or four “personal” sized pizzas if you divide the dough into smaller pieces.  One of the things I love about this dough is that it bakes up light and crispy – especially if you use a pizza stone and a screaming hot oven.  IMG_2304

A few things to know:

  • Using a pizza stone makes a MUCH better crust.  And pre-heat the stone while you’re pre-heating your oven.  Then the crust will crisp quickly when it hits that hot stone.
  • Cook in a HOT (HOT!) oven – I usually cook mine at 500 degrees (F).  If I didn’t set off all of the safety mechanisms on my stove and range hood, I’d do it hotter, but I’ve learned that it’s not worth having all the alarms go off for 50 degrees more heat. Smile with tongue out
  • Rising time is important. Plan your meal prep with enough time to allow at least 45 minutes for the dough to rise. You really can’t rush the little yeasties. Patience will pay off.
    IMG_2293

    ^^ before the rise ^^

    IMG_2294

    ^^ after 45 min rise time ^^

  • Get some grits. I know this sounds crazy, but we have learned (the hard way) that your pizzas will not slide off of a peel or cutting board very well once the dough is a little warm from rolling it out and then heavy from adding the toppings.  Last week we had cheese, dough, etc. all over my oven door and floor because of an uncooperative pizza that didn’t want to slide off of the peel.
    Grits (corn meal) under your dough (before you top your pizza) will act like little marbles and let the pizza slide right off of the peel.  And they add some crunch to your crust!
  • If you don’t have grits (you’re not from the South, are you?) then you can always roll your dough out on parchment (not wax) paper and bake the pizza on the parchment paper.  You just have to be careful because the parchment gets really crispy (brittle) in the oven and makes it a little tricky to pull the pizza out of the oven.
  • You can make this in a stand mixer or in your food processor. I’ve done it both ways. It usually depends on which appliance happens to be out on my counter at the time (or which is clean and not dirty!) Heck, you can even mix this by hand if you want. It’ll be a good workout for you. Winking smile
  • We usually get two meals (at least) out of this pizza-making session. One the night we make them and then one for lunch or supper a few days later. And it’s WAY cheaper than takeout pizza (and SO MUCH tastier!)

Pizza Dough

1 cup very warm water
2 1/4 tsp yeast
1 Tbsp honey
2 tsp salt
2-3 Tbsp grated Parmesan cheese (like Kraft Parmesan)
2 Tbsp olive oil
1 Tbsp Italian Seasoning
~3 Cups flour (I used King Arthur White Whole Wheat flour)

  1. In a mixing bowl, combine water, yeast & honey. Let the yeast “bloom” for about 5 minutes.
  2. Add the oil, half of the flour (1.5 cups) and mix with a dough hook.
  3. While mixing, add the Italian Seasoning, salt and gradually add the remaining flour a little at a time until the dough begins to form a ball and pull away from the sides of the bowl.
  4. Knead for 6 minutes.
  5. Once the time has elapsed, remove the dough hook and form the dough into a ball.
  6. Lightly oil the mixing bowl and put the dough ball back in.  Cover with a towel and let rise in the for 45 minutes to an hour. (preheat your oven while dough is rising)

In Action

Here’s our little pizza making session Saturday night:

PL 4x6 print pages - Page 061

^^ Rolling out the dough – topping the kids’ pizza ^^

PL 4x6 print pages - Page 062

^^ SuperMan making his monster pizza with 45 toppings. I swear it weight 10 pounds! ^^

IMG_2309

^^ Topping my BBQ Chicken pizza. ^^

IMG_2311

^^ The masterpiece ready for the oven. ^^

IMG_2313

^^ SuperMan says quit taking pictures and let’s eat! ^^

Wonderful Waffles for Supper

I’ve gotten on a “breakfast for dinner” kick.

It’s super easy, inexpensive, and lets you enjoy some breakfast-y things that you would not normally have time to make during the week at breakfast time.

Like waffles.

You see, I’m not a morning person. Never have been.

And so, my kids suffer at breakfast because I’m struggling most mornings to be vertical and coherent for them.  Cooking fantastical breakfasts is just not going to happen.

But cooking an awesome “breakfast” for dinner? Totally do-able.  I’m awake at 5PM, just not so much at 5AM.

So, we’ve been making breakfast for dinner the past few weeks… It’s sort of become our Thursday night dinner tradition since the kids aren’t wild about leftovers and Thursdays are a busy day with dance classes, etc.

I’ve been hunting for a good waffle recipe. Something that was a “scratch” recipe and not from a box.  Last week we tried one that was just okay. Not great, and not something we wanted to try again –

And so this week I went looking for new recipes to try.

What I found was that there are not too many variations – eggs, flour, sugar, etc.

What did differ was whether the egg whites were whipped or not.  The first recipe we had tried did not have the whipped egg whites and the waffles were flat – in taste and volume. I wondered if whipping would make a difference, but, quite honestly, it seemed like a lot of extra work. Was there really a payoff?

Then I found a recipe on Food Network’s website for “Waffles of Insane Greatness” which are from Aretha Frankenstein’s restaurant in Tennessee. Right off the bat I was intrigued – the name of the waffles, the name of the restaurant and the fact that it was a southern recipe.  Then I saw that you don’t have to whip the egg whites. Score!!

I had also found this recipe for the Very Best Waffles (they claimed) – I printed it out and compared to the Insane waffle recipe.  Pretty much the same with the exception of the addition of some spices.

I had one other requirement for my waffles that no recipe included but that was non-negotiable for me. They  had to have some added protein.  I couldn’t handle the carb-fest myself and wanted to be sure the family got a little more protein in their dinner, even if I had to sneak it in. I figured I’d improvise that part.

I headed into the kitchen to give it a go…

waffles

They turned out, well, wonderful…

So much so, that, as I’m typing I’m nibbling on one, cold & dry, and yet it’s still good.

The kids loved them, SuperMan devoured them, and after I ate one, I collapsed on my rocking chair in a blissful carb coma.  (but it was worth it)

So, give these waffles a try – it’s a fast and easy way to whip up some supper one night without a big ole mess in the kitchen.  Serve them up with some bacon, fresh fruit and you’ll have your family singing your praises…

Wonderful Waffles

Ingredients:

Dry ingredients:

3/4 cup all-purpose flour
1/4 cup cornstarch
1/2 tsp baking powder
1/4 tsp baking soda
1/2 tsp salt
1 1/2 tsp sugar

Wet ingredients:

1 cup buttermilk (or whole milk mixed with about 1 1/2 tsp white vinegar to make 1 cup of “buttermilk”)
1/3 cup vegetable oil
1 egg
1 tsp vanilla extract

Optional Ingredients:

1/2 tsp almond extract (optional)
1/8 tsp ground nutmeg (optional)
1/4 tsp ground cinnamon (optional)

2 scoops vanilla protein powder

Instructions:

1. In a mixing bowl, combine the dry ingredients.

2. If using, add the cinnamon & nutmeg to the dry ingredients.

3. In a measuring cup, combine the buttermilk, oil, extracts and egg. Combine gently.

4. Pour liquid ingredients into the dry ingredients and use a whisk to combine.

5. Let the batter sit for 5-10 minutes while your waffle iron heats.

6. Spray your iron with nonstick cooking spray and ladle some batter onto the iron. Bake them as per the instructions for your iron.

7. Serve immediately or keep warm in preheated oven until ready to serve.

A couple of things to note:

– I doubled the recipe and got 10 waffles. Depending on how many people you’re feeding you may need to double as well.

– I think next time I will preheat my oven to 200 degrees, as the one recipe suggests, and put the finished waffles on the rack in the oven to stay warm until they’re all finished being made. That way we can sit down and eat together rather than in shifts as I finish up waffles.

– The almond extract, nutmeg and cinnamon are completely optional but I put them in and I think it added a great flavor. Big Girl was not crazy about the nutmeg. I may leave it out next time since I’m the only one who is really nuts about nutmeg around here.

– The protein powder is also optional and using it only enhances your protein content of your meal. You don’t need to add any extra liquid if you it. (or take any away if you don’t)

– I had a few left after we ate dinner and I put those in a ziplock bag in the refrigerator for breakfast the next day.  I reheated them in the toaster oven.

On the Needles: Stash Bustin’

I’m in between big projects right now – not really ready to start on another blanket or something big, so I decided to finish off some cotton yarn I had and make some washcloths. Quick, easy and gives you a sense of accomplishment because you can usually do one in a day…

IMG_2278

So I’m chugging along here – the one above is a single crochet I started this evening while watching Duck Dynasty with the family… probably finish it off tomorrow.

IMG_2279

And this one I made on Sunday afternoon – I think I did a double crochet, but I honestly can’t remember. (I’ve slept twice since then, you know?)

IMG_2280

It’s about 9×8 inches… They shrink quite a bit when they’re dried, so I make them larger to allow for that shrinkage. If you air dry them and stretch them back out while they dry they’ll hold their size and shape pretty well, but I’m lazy and usually just throw them in the dryer with the other towels.

They are extremely durable – they hold up to pot scrubbing, face washing, counter cleaning – you name it – and bleaching.  I have some knitted ones that are close to three years old now and they look just like they did when I first made them. (Especially the ones the girls claimed for Barbie blankets LOL)

Do you crochet or knit household linens?

comments graphic2